Simplify Ghost Backups: Automating with Bash and Dropbox

Introduction
I am using Ghost CMS on a self-hosted server, and I absolutely love it. Hosting your own instance means you have complete ownership of your content, with no intermediaries between your creative work and your audience.
However, if you don’t use the Ghost CMS PaaS approach, you’ll need to handle certain tasks manually—such as backing up your content and transferring that backup off your server.
If you find yourself in this situation, follow along to learn how to simplify your workflow and automate backups using Bash scripting, Ghost CMS, and Dropbox.
Let's Begin
What you will need:
- A ghost installation, we suppose that it's installed in the
/var/www/ghost - Bash Shell with
jq,expect,curlinside - Sufficient privileges (of course...!)
By default, Ghost recommends installation in the /var/www/ghost folder, so we are going to use this as a reference, supposing your ghost installation resides in this folder.
Ghost CMS has a very handy CLI, allowing users to manage various aspects of its lifecycle, such as handling multiple Ghost installations, integrating Ghost into your machine's startup processes, restarting it, and, among other tasks, backing up your content.
Create an application into dropbox
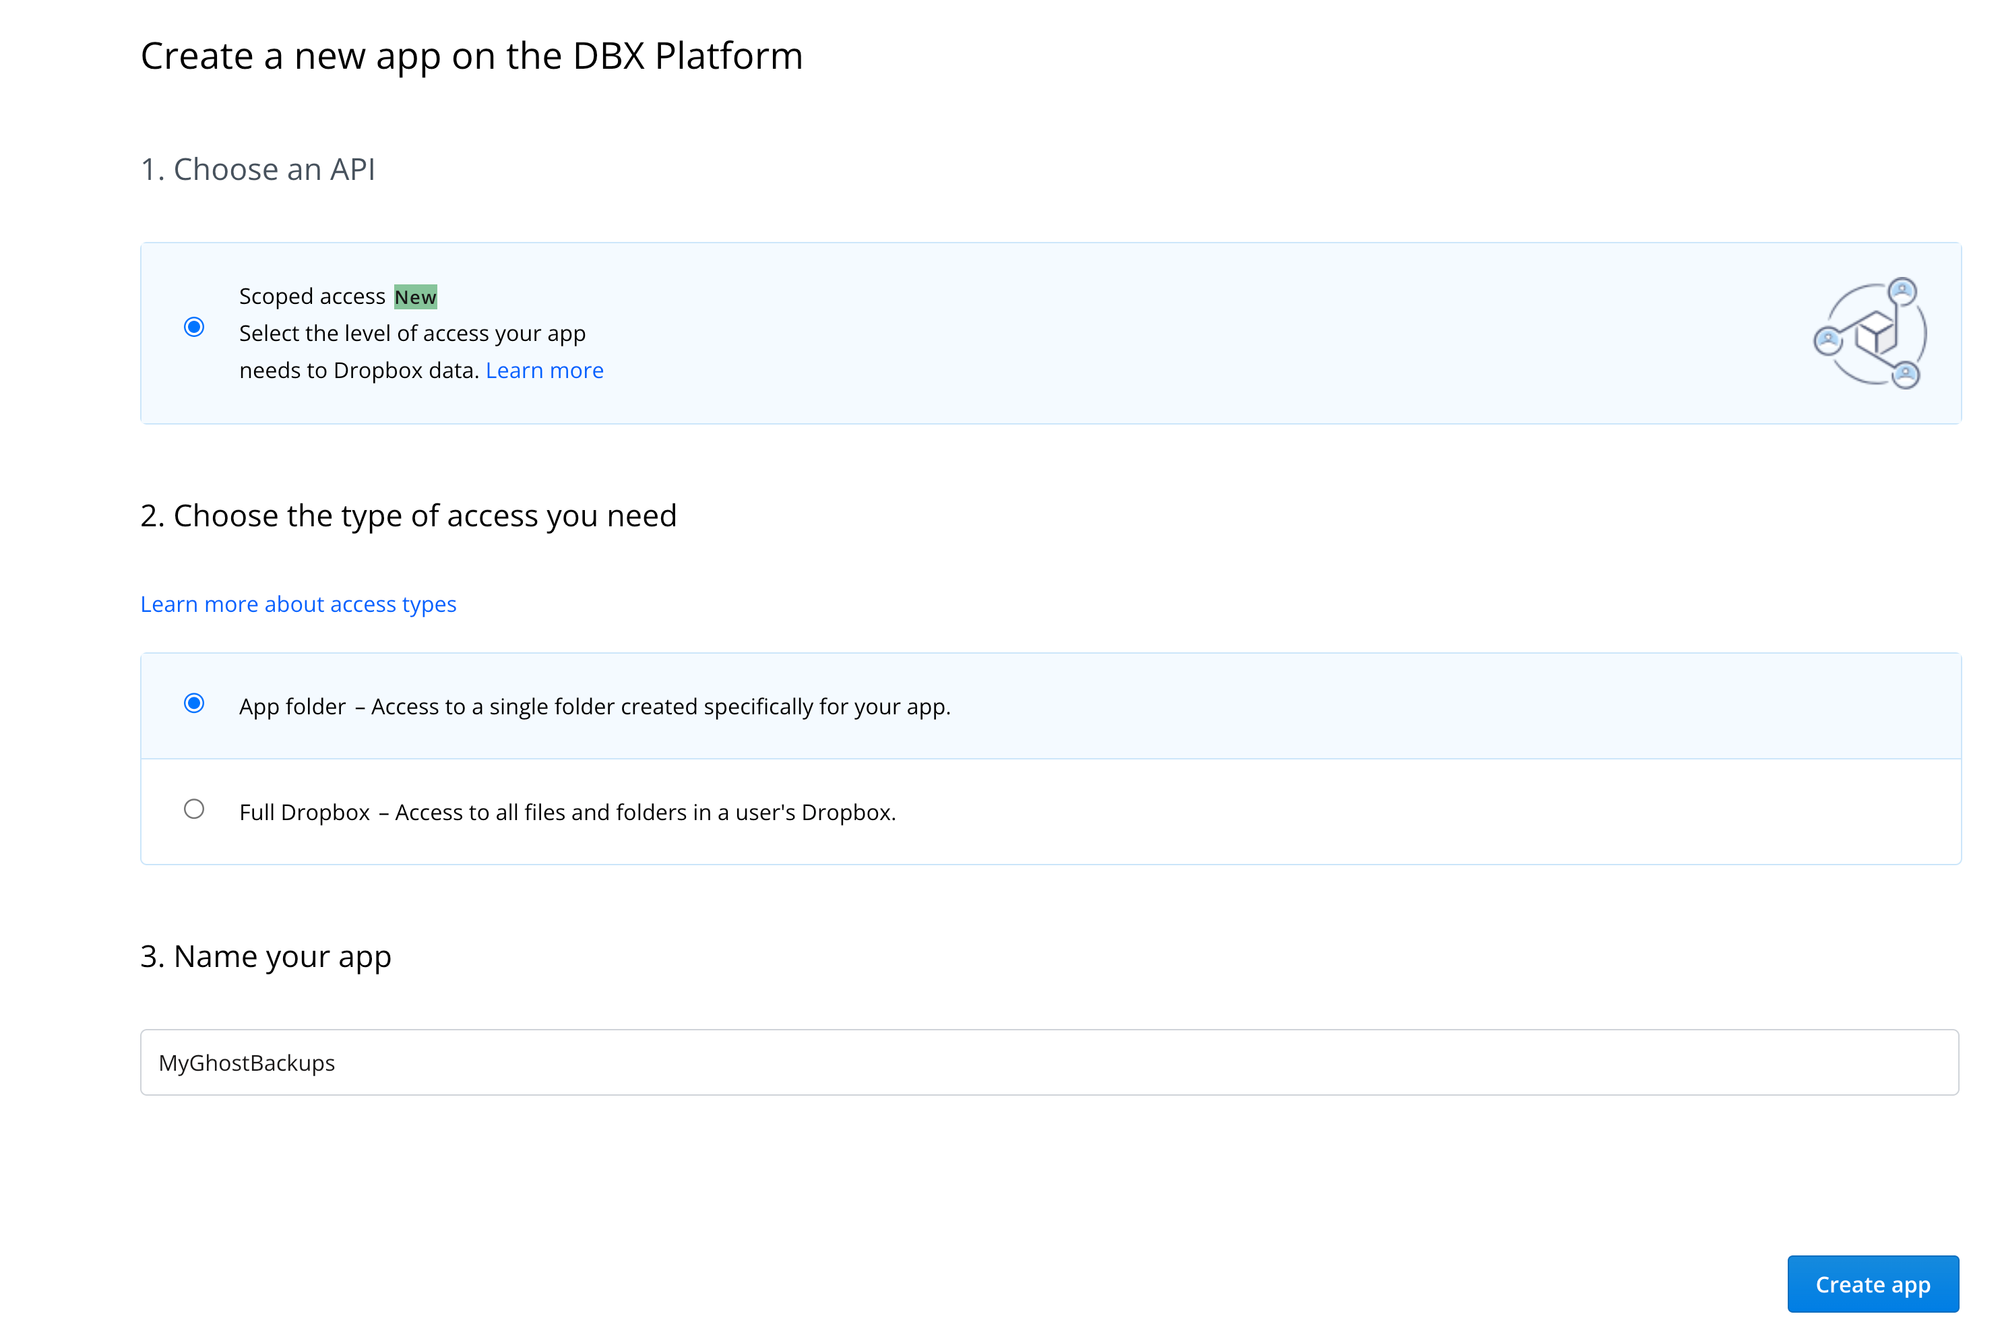
To use Dropbox REST API, you will need to create an OAuth 2.0 application into dropbox. To do this, visit this page - https://www.dropbox.com/developers/apps and Click on the Create app button

We intend to upload our backups into a specific folder, so we need to tick only the "App Folder" as Access Type. Click on "Create App" when you're done.
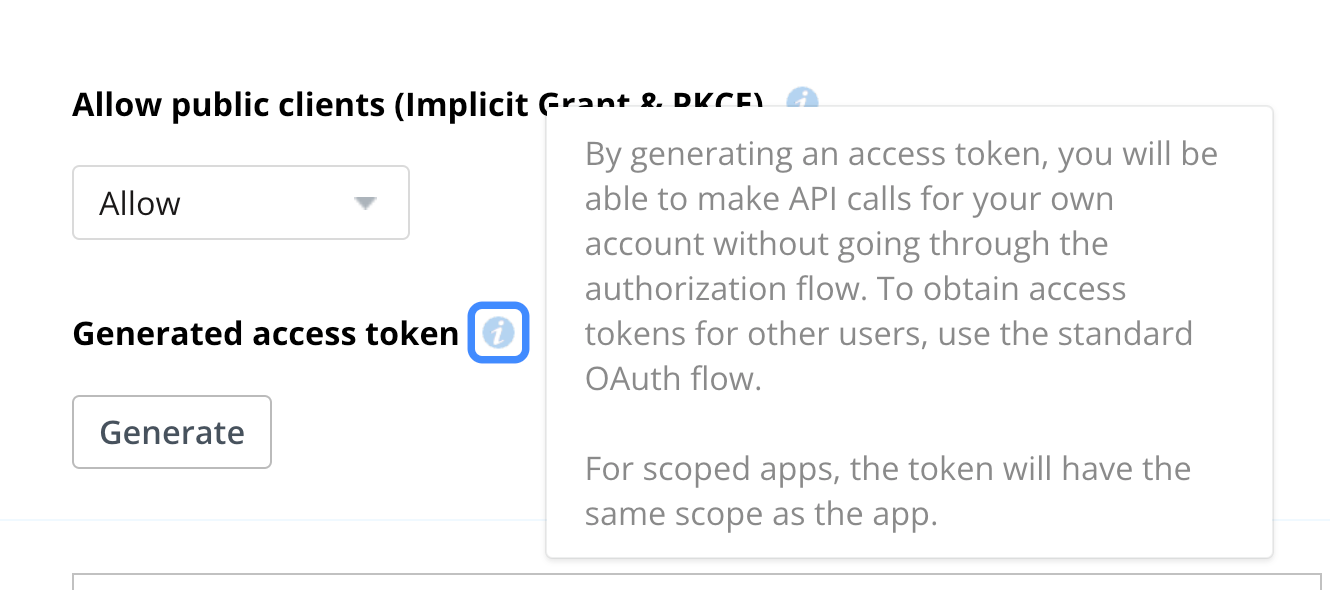
Next you will need to create an access token to communicate with Dropbox via REST. Click on the "Generate" button to get your token. Write it down, and save it for later.

We are going to use this token with our script.
Performing the backup
Creating the backup file
A full website backup is created using the Ghost CLI's ghost backup command. This command generates a ZIP file containing all your website data: images, uploaded files, themes, posts (in the form of a large JSON file), and a CSV file with your website's users. The Ghost CLI provides utilities and commands to fully restore your website using the contents of this ZIP file.
There is a catch, though: when performing a ghost backup, we must manually input a Ghost admin's email and password, which cannot be passed via the command line without prompting.

This limitation hinders efforts to fully automate the backup process. Despite extensive research, I could not find a way to pass these credentials as command-line arguments without user interaction.
To resolve this issue, we can provide the required inputs programmatically, simulating user input. This is where expect comes into play. The expect tool allows you to write scripts in a Tcl-like syntax to handle interactive prompts automatically.
The following expect script runs the ghost backup command, waits for specific input prompts (the Ghost admin's email and password), and then provides the required inputs automatically:
#!/usr/bin/expect -f

cd "$GHOST_DIR"

set timeout -1
spawn ghost backup
# Look for the username prompt
expect "Enter your Ghost administrator email address"
send "$GHOST_ADMIN_USER\r"

# Look for the password prompt
expect "Enter your Ghost administrator password"
send "$GHOST_ADMIN_PASS\r"

# Wait for the backup to complete
expect eof
As shown, this program is executed not by bash, but by its own executable, expect. Since expect uses Tcl, we need to call this script from our main Bash script as an external file.
Here's how we can integrate this expect script into a Bash script. Some global variables, like GHOST_ADMIN_USER and GHOST_ADMIN_PASS, are omitted for brevity.
EXPECT_SCRIPT=$(mktemp)
echo "creating script at $EXPECT_SCRIPT"
cat <<EOF >"$EXPECT_SCRIPT"
#!/usr/bin/expect -f

cd "$GHOST_DIR"

set timeout -1
spawn ghost backup
# Look for the username prompt
expect "Enter your Ghost administrator email address"
send "$GHOST_ADMIN_USER\r"

# Look for the password prompt
expect "Enter your Ghost administrator password"
send "$GHOST_ADMIN_PASS\r"

# Wait for the backup to complete
expect eof
EOF


chmod +x "$EXPECT_SCRIPT"
trap 'rm -f "$EXPECT_SCRIPT"' EXIT

echo "about to run"
BACKUP_OUTPUT=$(expect "$EXPECT_SCRIPT" 2>&1)
echo "run finished with output: $BACKUP_OUTPUT"
The above script performs the following actions:
- Creating a temporary file using
mktemp. - Writing the
expectscript into this temporary file and making it executable. - Setting a trap to ensure the file is deleted when the script ends, even if an error occurs.
- Executing the temporary script using
expectand capturing its output in theBACKUP_OUTPUTvariable.
By using this method, you can call ghost backup from command-line scripts, facilitating integration into CI/CD pipelines and automating the backup process efficiently.
Uploading to Dropbox
After having created the ZIP file, we will need to upload it to Dropbox. The best way to do this is via Dropbox's REST API. According to Dropbox's HTTP REST API Documentation, the method we want to use is the "/upload" method.
We will need to encode arguments we want to JSON, and pass them stringified to the Dropbox-API-Arg Header argument. We will use the jq command to do this.
DROPBOX_API_ARGS=$(jq -nc --arg path "$DROPBOX_PATH/$(basename "$BACKUP_FILE")" \
                      --arg mode "add" \
                      --arg autorename "true" \
                      --arg mute "false" \
                      '{path: $path, mode: $mode, autorename: ($autorename == "true"), mute: ($mute == "true")}')
Then, we will need to call Dropbox REST API properly, and upload our file.
RESPONSE=$(curl -s -X POST https://content.dropboxapi.com/2/files/upload \
    --header "Authorization: Bearer $DROPBOX_TOKEN" \
    --header "Content-Type: application/octet-stream" \
    --header "Dropbox-API-Arg: $DROPBOX_API_ARGS" \
    --data-binary @"$BACKUP_FILE")
Cleaning backup files
Since ghost backup creates a large backup file, it is best to keep an archive of only the latest backups inside the server, deleting older ones. I personally prefer doing that even after having uploaded the backup files to my personal Dropbox. Here is a way to do this using the find command.
find "$BACKUP_DIR" -type f -name "backup-from-v*.zip" -mtime +"$LOCAL_BACKUP_RETENTION_DAYS" -exec rm -f {} \;LOCAL_BACKUP_RETENTION_DAYS is an integer set at the top of the script
Full script
If you want to see the full script, I have made it available as a gist.
Final touches
One last thing that you might wish to do is to make this script a crontab task, to be ran periodically. To do this, follow these steps to ensure it runs automatically at the end of each month:
- This ensures the script only runs on the last day of the month.
- Replace
/path/to/backup_script.shwith the actual path to your script.
Edit the Crontab: Open the crontab file for editing:
crontab -eAdd the Cron Job: Insert the following line to schedule the script for execution at 11:59 PM on the last day of each month:
59 23 28-31 * * [ "$(date +\%d -d tomorrow)" == "01" ] && /path/to/backup_script.sh- This ensures the script only runs on the last day of the month.
- Replace
/path/to/backup_script.shwith the actual path to your script.
Save and Exit: Save the changes to the crontab and exit the editor. The task will now run as scheduled.
By configuring the script in crontab, you eliminate the need for manual intervention, ensuring consistent monthly backups for your Ghost CMS.
Conclusion
By following the steps outlined in this guide, you can create an automated backup solution for your Ghost CMS self-hosted installation.
This approach not only simplifies backup management but also provides peace of mind, knowing your data is protected from unexpected issues. Whether you're a solo blogger or managing multiple Ghost instances, these tools and techniques will streamline your workflow and safeguard your content effectively.