React and MobX-state-tree

Building a simple app with this excellent alternative to Redux
For the past 6 years, React has been my go-to solution for developing web interfaces. Its concepts are simple to grasp, and I also love how it allows me to build my own stack around it to build the frontend interface I need specifically adapted to each use case.
That flexibility comes at a cost, however — there are so many choices to cover each aspect of an application that it’s impossible to start experimenting with all of them to figure out what is the most suitable technology for a website.
State Management solutions for React
Nowadays, frontend web applications behave more like desktop applications than old school apps. The state is saved in variables inside the code that is running on the browser. With the advent of Single Page Applications powered by React and Angular frameworks, global state management became increasingly important. Also, frontend applications become bigger and bigger as time passes and the industry moves on. Holding user preferences, site-wide selections, and having a reactive user interface became a necessity. There are very few things that have more impact on your project than the choice of state management.
For the past 5 years or so, Redux (developed in 2013) has been a de-facto standard when considering a state management system. It changed the way React applications were being developed (although it is framework agnostic). It allowed scaling a React application to a previously unmanageable level due to its complexity with state management and props passing between components in different places of the frontend application.
Its massive adoption has become so widespread that many people are not sure why they are using it, and bad practices are all over the place. So much so that the creator of Redux officially made a blog post explaining that Redux is not a panacea and that you might not need it in the end.
…and I have to admit it: I wouldn’t say I like Redux very much. I am still using it in many projects — I like how it integrates with React and its hooks. However, there are alternatives like:
- Mobx with its derivative, MobX-state-tree
- Recoil
- Akita
- Vanilla React Context API
I’m sure I forget something. And I won’t tell you that I have used all of them. But I have used Mobx and Mobx-state tree extensively, and it surprised me that they are not more popular than they are today.
Why Mobx-state-tree?
MobX-state-tree is an opinionated state management framework based on MobX. Actually, this may be the most opinionated of all the alternatives, which is not necessarily bad.
Personally, I am using mobx-state-tree mostly because I want to:
- Know where the code handling the state is — This is very important for me, which annoys me very much with Redux, as the state code is split among reducers, action creators, etc. With MobX State Tree (MST from now on), your code is concise and in one place.
- The code is predictable and clear. With MST, you will never be left wondering how you will structure your models or structure your models to update your user interface. MST uses its own data types, forcing you to create trees of data structures.
- It is strongly typed. Even when using Javascript, the data a model holds is type-checked. Typescript integration is a breeze, too.
Differences between Mobx and Mobx State Tree
- MST is very opinionated. It forces you to structure your models in a particular way and use them using the library's concepts. This is one reason why I prefer MST over plain Mobx, but I understand that this is a personal preference.
- MST is type-checking your model’s properties even when using plain Javascript, whereas plain Mobx does not. There may be a small performance penalty to that (although I don’t have any concrete data to back this up, nor have I seen any metrics showing something like this)
- MST’s design revolves around a centralized model containing sub-models. You use those sub-models in your components. In a way, this resembles more a centralized store the way Redux does it. Mobx does not pose any such restriction, and you can create as many stores as you want and use them wherever you want.
A simple application
Let’s build a simple application that will do these things:
- Use https://restcountries.eu/ API to retrieve a list of available countries, and present them. This will give an idea of how to perform asynchronous actions with MST.
- Refresh this list every 60 seconds. This will allow us to examine how to use volatile variables.
- The list will be refreshed either manually by pressing a button or setting up a time interval, which can be invalidated via user input.
To construct our simple application, we will use Typescript. We will also not invest any time at all in formatting / making our application prettier. The sole purpose of our example is to show the usage of MST in a React application.
Let’s begin with the code that sets up the store that will hold all the variables inside.
Application Scaffolding
We will begin using a simple Create React App scaffolded application, set up to use typescript,
npx create-react-app my-app --template typescript
# or
yarn create react-app my-app --template typescript
then, we will need to add a few components that we will need to develop the rest of the application:
npm install --save axios mobx-react-lite mobx mobx-state-tree
# or
yarn add axios mobx-react-lite mobx mobx-state-tree
Setting up the store
The following model will depict each country item. Note that there are many more variables in the full API offered by RESTCountries, but I decided not to include them for clarity.
interface Country {
  name: string;
  alpha2Code: string;
  alpha3Code: string;
  callingCodes: string[];
  capital: string;
  region: string;
  population: number;
  area: number;
  gini: number;
  borders: string[];

  currencies: Array<{
    code: string;
    name: string;
    symbol: string;
  }>;
}
We will create two MST stores, one that holds the Countries and another that holds the countries' store (the Root Store). In general, it’s expected to embed MST models into other models and use a RootStore, and that’s what we are going to do here (although it may be a bit unnecessary for such a small exercise).
const CountryStore = types.model({
  countries: types.array(types.frozen<Country>()),
});

export const RootStore = types.model({
  countryStore: CountryStore,
});
We use types.frozen here, as a means to hold an API response. frozen is meant to hold a value that is serializable and immutable. For the sake of this example, we are going to treat it like this — since we are not going to mutate any part of the response, but the response is indeed a JSON object comprised of plain values (thus, serializable).
export function initializeStore() {
  _store = RootStore.create({
    countryStore: { countries: [] },
  });
  return _store;
}
We intend to pass the RootStore from the root element of our application to all other elements of our app. To do this, we will use React’s Provider API.
const RootStoreContext = createContext<null | RootInstance>(null);
export const Provider = RootStoreContext.Provider;
Then, we will be able to inject it in any element we intend to use, via useContext . Let’s write a method to safely retrieve this (checks if the store has been initialized appropriately.
export function useStore(): Instance<typeof RootStore> {
  const store = useContext(RootStoreContext);
  if (store === null) {
    throw new Error("Store cannot be null, please add a context provider");
  }
  return store;
}
The full code for the initial version of thestore.tsis here:
We now want to initialize the store and inject it into our application to retrieve it from any component later.
Inside our App.ts:
const store = initializeStore();

function App() {
  return (
    <Provider value={store}>
      <div className="App">
        <CountriesList />
      </div>
    </Provider>
  );
}

export default App;
Notice the usage of CountriesList inside the class. This is the component that will present the list of countries and will consult the Store to do so.
Each component that needs to use a store’s properties to fill the UI with data needs to be an observer. To make this an observer, we need to import the observer Higher-Order-Component from mobx-react-lite . Now, we can use the useStore method we created inside the store.ts file, to get the instance of our store. Remember that the store is passed to any component through the use of React’s Provider API. We can then use the store’s properties normally as if it was any other observable object.
You may be wondering what is this countryStore.refreshCountries() we are using inside our component. This is an action that retrieves the data. More on this a bit later.
We run our application and we can now see an empty page. This is correct — we haven’t retrieved any data yet.
Populating our list with data
What we now need to do is to populate our CountriesStore with Data retrieved from the feed. We will use Axios to perform our queries and retrieve the data from the restcountries.eu website. Remember this countryStore.refreshCountries() we talked about earlier? It’s time to write some code for it so that we can use it inside our component.
We will need to perform an asynchronous operation to retrieve the data and store them in our CountriesStore . Keep in mind that in MST, the properties of a model cannot be changed from anywhere. The opinionated nature of MST forces us to change the state from inside a actions method. actions’ argument is a callback, which passes an argument to the caller (let’s call it self) which is actually an object having the store’s mutable properties. So we can do self.countries=… without having MST complaining.
Moreover, when we need to deal with an asynchronous operation, we need to pay extra attention when writing our actions. Mobx explains why inside the documentation.
Here’s the gist of it: If you want to make alterations to an MST model’s properties, you have the following options:
- Use good old promises, and call separate actions to set the new value on the model’s properties.
- Use generators to simulate the usage of an
async-awaitoperation.
We will choose the latter, as this will keep the code concise. Unless there is a particular technical reason to follow method 1, I always choose to use a generator function wrapped with the flow HOC
export const CountryStore = types
  .model({
    countries: types.array(types.frozen<Country>())
  })
  .actions((self) => {
    const refreshCountries = flow(function* () {
      console.log("refreshing countries...")
      const response: Country[] = yield axios
        .get("https://restcountries.eu/rest/v2/all")
        .then((value) => value.data);

      self.countries = cast(response);
    });

    return { refreshCountries };
  });
Note the code inside the actions and note that the refreshCountries is a generator function wrapped with the flow Higher-Order function. Also, note that yield behaves like an await keyword and accepts a Promise , effectively allowing us to perform any asynchronous operation inside a Model’s action.
If we hit Refresh in the browser, we should see the list is populated. Our component draws an elementary and ugly list of country names retrieved by a REST API asynchronously.

We could stop here. However, there is one other aspect of MST that I would like to cover, as it was non-trivial for me to discover.
Adding auto-refresh in the store
Let’s add a feature and a new section inside our little application that will have the following features:
- Show the count representing how many times we have called the REST API to refresh our countries list.
- Allow is to set up and tear down a timer that will auto-refresh the list every X seconds.
The way to store the data we need is not so straightforward as it sounds. We will need to store an intervalId so that we can set it or cancel it using setInterval . We will not hold it with the rest of our properties because this is not an observable value. It’s a volatile value. And MST has this concept covered inside the documentation.
actions can be chained, which is a perfect way to add some actions that control their own state and have some private values that we don’t want anyone else to access.
First of all, let’s add a new property to the CountryStore to measure how many times our list has been refreshed and if the timer for auto-refresh is currently active.
export const CountryStore = types
  .model({
    countries: types.array(types.frozen<Country>()),
    timesRefreshed: types.number,
    autoRefreshActive: types.boolean,
  }
Then, let’s add another actions section that will set up and tear down the auto-refresh.
Note the usage of the timeIntervalId. This holds the interval ID of the Javascript timer. We chose to let this variable exist as a local scope inside the actions section as it is not observable, and we want it to be private. This is also called “local variable” in MST terms.
We will also need to update our refreshCountries method to increment the timesRefreshed counter every time a refresh has occurred.
const refreshCountries = flow(function* () {
  const response: Country[] = yield axios
    .get("https://restcountries.eu/rest/v2/all")
    .then((value) => value.data);
  self.countries = cast(response);
  self.timesRefreshed += 1;
});
Now, let’s add a new component named ListRefreshControl , whose responsibility will be to manage the refresh of the countries list and setup/teardown the timer to do so.
And finally, let’s update our App Component to accommodate this new Component.
Let’s run the application.
It’s time to run the application. Visit localhost:3000 in your browser, and you will see the following picture.
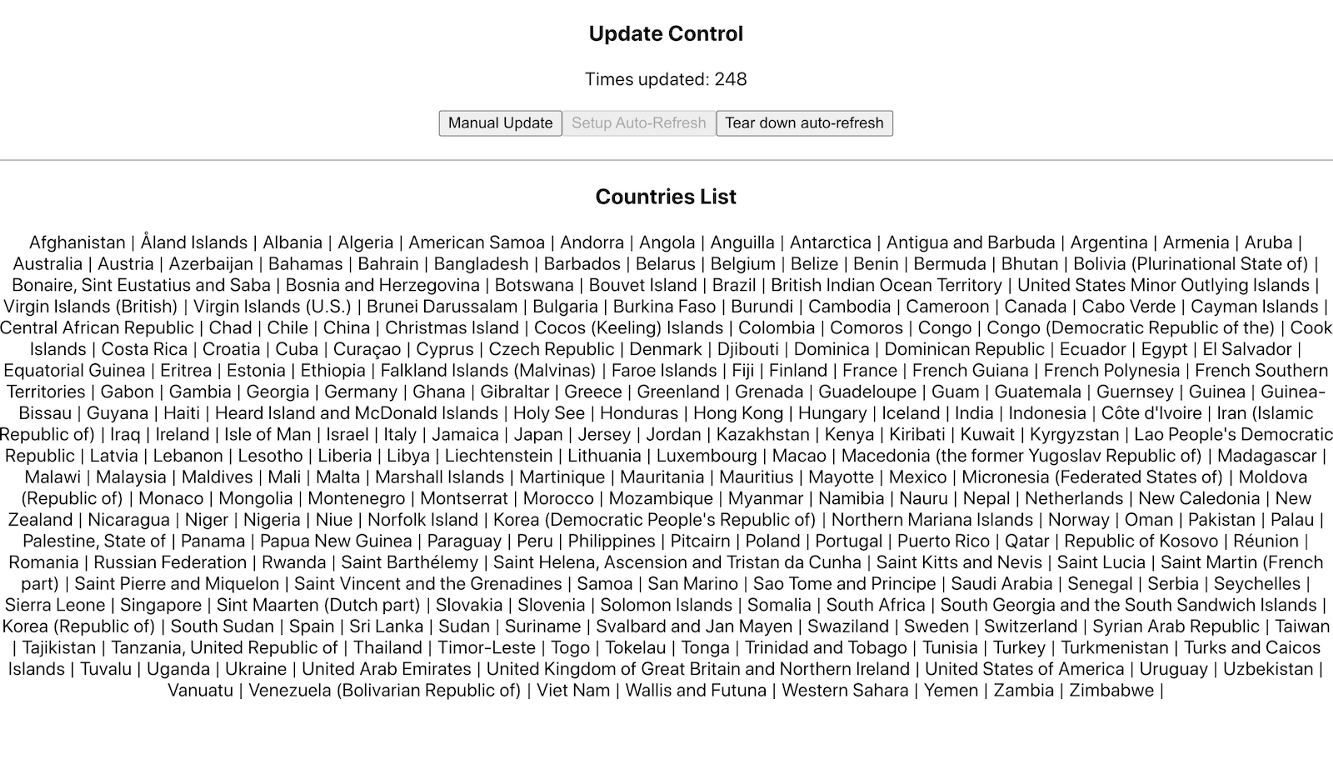
Pressing the “Manual Update” button will refresh the list of countries and will increment the “Times Updated” counter at the top of the page. If you press the “Setup Auto-Refresh” button, it will be disabled, and the timer will start. The list will be auto-updated every 10 seconds. Pressing the “Tear-down auto-refresh” button will invalidate the timer, and the auto-refreshing will stop.
Full store.ts
For the sake of convenience, here is the source code of the store.ts file, containing everything we talked about.
Conclusion
MobX-state-tree is an excellent opinionated alternative to Redux, providing good Typescript support, type checking for Javascript, conciseness, and great integration with React. I find myself using it increasingly more often, and it has helped me reduce the size of my codebase a great deal while still having all features that one would need to develop a full-featured application.
I personally find it even more attractive than plain mobx, whose freedom of choice when it comes to structuring the codebase and storing variables meant no universally accepted way of doing all those things.
I suggest you try it yourself and see how and if it can fit into your projects.
References: