Unlocking the Power of Kubernetes Operators

Real-world examples and use cases for Kubernetes Operators, from development to production
Introduction
If you are working with Kubernetes, you may have come across the term “Operator”. If you haven’t, then perhaps the sibling term “Controller” will jog your memory.
Kubernetes is well known for being the de facto standard nowadays for deploying and orchestrating microservices. It automates the deployment, scaling, and management of containerized applications. Kubernetes can manage and schedule containerized applications across a cluster of servers, provide self-healing capabilities, and enable horizontal scaling for improved application availability and resilience. In other words, it covers all aspects of production and preproduction microservices deployment, from top to bottom.
The above responsibilities are based almost entirely on providing Kubernetes with configuration files as yaml files. A lesser-known fact (but very well-documented), however, is that Kubernetes is also extensible via yaml files.
But why would someone need to extend Kubernetes, and what would such an extension look like?
In this article, I will explain the characteristics of Kubernetes Operators and clarify any confusion about how they are used and why. But before we can delve into the nuances of Kubernetes operators, we need to refresh some basic concepts and redefine them more strictly for future brevity.
Kubernetes Resources in a nutshell
Kubernetes exposes its functionalities and operations through an API. The most basic concept of Kubernetes is a Resource, which is an instance of a Kubernetes Resource Definition. There are predefined Kubernetes Resources baked into the Core, and each resource represents an endpoint in the Kubernetes API. For example, if you define a Pod resource, Kubernetes will give you a Pod instance. Similarly, if you define a Service resource, Kubernetes will expose your Pod inside or outside your cluster based on your YAML definition.
A few examples:
- If you define a
Podresource, Kubernetes will give you a pod instance. - If you define a
Serviceresource, Kubernetes will expose your pod inside or outside of your cluster depending on your yaml definition.
In the above example, the Service definition is built into Kubernetes as one of its core APIs, and your resource is an instance of this definition that Kubernetes recognizes and acts upon based on its contents.
As a Kubernetes user, you have the ability to extend the Kubernetes API by creating new resource types. CustomResourceDefinitions is a Kubernetes resource that enables developers to achieve this. By utilizing CustomResourceDefinitions, developers can define a new type of resource that can later be provided in YAML format. Furthermore, the Kubernetes API will create a new endpoint for this custom resource, allowing it to be manipulated with the same API and methods as other resources.
Custom Resources don't have any inherent functionality on their own. You can add as many Custom Resources to Kubernetes as you like, but unless you also add an Custom Resource Controller, nothing will be done.
Controllers and Operators
And that’s what Operators and Controllers are for, in Kubernetes.
- Controllers are applications that monitor Kubernetes resources that alter the state of Kubernetes as a side effect.
- Operators are specialized Controllers that listen to specific Custom Resources, so they can produce side effects based on those Custom Resources.
An example of a well-known Kubernetes Controller
Let’s go back to the Ingress example. To take advantage of the Ingress, you need an Ingress Controller, like the NginX Ingress Controller.
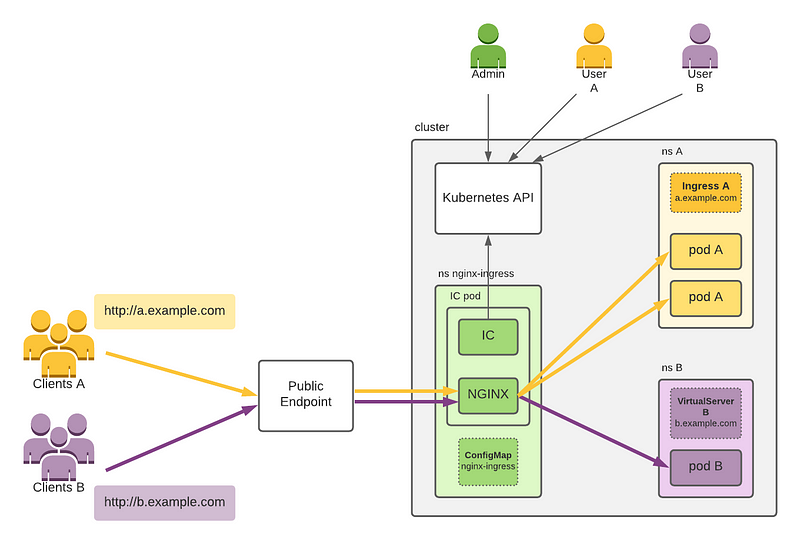
Contrary to what it seems at first sight, the Ingress is not what exposes your service to the public Internet.
- Ingress Controller installs an NGINX Pod (that does the re-routing), and a Controller Pod.
- The NGINX pod is exposed to the public internet via the
Serviceassociation with the pod. - The Ingress Controller monitors for events happening to
Ingressresources in Kubernetes and reconfigures the NGINX pod every time a change happens.
It’s important to note that while the Ingress resource does not directly expose your services, it is still a critical component of the Kubernetes architecture. Ingress resources (in our scenario) are used to configure the NGINX Pod’s behavior once it receives a request, such as specifying which Service to route the request to or adding SSL encryption.
The Ingress Controller and associated NGINX Pod are responsible for handling incoming network traffic, while the Ingress resource is used to configure the NGINX Pod’s behavior. By working together, these components provide a powerful toolset for managing network traffic in Kubernetes.
CustomResourceDefinitions (CRDs) and Operators
In the previous example regarding the Ingress Controller, a CRD was not included, hence the term "Controller". The use of CRDs, however, offers developers the ability to extend the Kubernetes API to apply custom logic. As previously mentioned, Kubernetes does not have the capability to understand a custom resource without explicit instruction. Consequently, CRDs must be accompanied by one or more operators that recognize the resource and execute tasks based on it. Why would someone use a CRD?
The following is an illustrative, non-exhaustive list of use cases for utilizing Kubernetes CRDs and the operator pattern
- Simplifying deployment setups: An operator can monitor a resource and deploy additional infrastructure sequentially without requiring developers to handle complex configurations.
- Providing advanced configuration setups: The Kong Ingress Controller is an example of a custom resource definition that enables developers to configure Kong Gateways using YAML files. This capability is a powerful tool for automating infrastructure.
- Making Kubernetes environment-aware. For example, when instantiating an EKS cluster, there are CRDs already in place with a few operators, whose general responsibility is to connect the EKS cluster with your AWS account. For instance: when you create a
Serviceof typeLoadBalancer, theaws-load-balancer-controllerwill create a Load Balancer in your AWS account and will connect it with your cluster. - Perform organizational side-effects. Major organizations take advantage of operators to cause side effects to their deployments for automating parts of their infrastructure that is out of the Kubernetes nodes (like provisioning entirely new systems).
- Performing regular backups of important resources
Here are some examples of how some well-known companies leverage CRDs and Operators;
- Kong is using CRDs and Operators for Kong Ingress Controller. Kong CRDs include definitions of Kong Consumers and Kong Plugins, which Kong Controller (deployed also inside Kubernetes) recognizes and configures the Kong Gateway appropriately
- Elastic is using Operators with their CRDs to provide a simple deployment methodology (version 8). The developer would just use the
ElasticSearchCRD with theKibanaCRD which provides a very simple API. The Elastic operator (also installed with the same helm chart) will monitor those resources and will create Kibana and Elastic Search instances and provision them (with their certificates, secrets, etc). That simplifies installing ECK in Kubernetes. - Consul has CRDs that allow for configuring
ServiceDefaultsandServiceIntentionsthus allowing for configuring the communication between the services declaratively.
Note that in the above examples, we use the term Operator. That happens because those are Controllers that monitor those specific CRDs and make changes to the cluster (or components of it) accordingly.
Putting it all together: A practical example
Now that we have a basic understanding of what Kubernetes operators and CRDs do, let’s construct our own Kubernetes Operator coupled with a CRD, to test the mechanics of CRDs and Operators.
For this example, we will use Quarkus, with its Kubernetes Client, which uses the Fabric8 Kubernetes Client. Quarkus is a good choice for a Kubernetes operator since:
- It can be compiled to Native, therefore allowing the operator to work with a minimum set of resources (20mbytes RAM, 20 miliCPUs)
- It uses Java which allows strongly typing your resources, allowing for better maintenance later down the road (this is important for larger teams)
Prerequisites:
- Quarkus
- A running Kubernetes Cluster, like Microk8s.
Sample Use Case
Let’s define a sample use case, where we orchestrate the deployment of a service and the generation of a secret to be passed in it as an environment variable..
- The developer will deploy an application using a new type of yaml (Custom Resource)
- The operator will recognize this yaml and will create a new secret containing an auto-generated hash
- The operator will then create a new
Deployment, and will deploy a pod (the name of the image will also be inside the Custom Resource), and will pass the newly generated secret inside the new pod as an environment variable.
Implementation and code
The Custom Resource Definition would look like this. Write this into a file and add it to your Kubernetes installation with kubectl apply -f mycrd.yaml .
apiVersion: apiextensions.k8s.io/v1
kind: CustomResourceDefinition
metadata:
  name: applications.oramind.com
spec:
    group: oramind.com
    versions:
      - name: v1
        served: true
        storage: true
        schema:
            openAPIV3Schema:
                type: object
                properties:
                  spec:
                    type: object
                    properties:
                      application-name:
                        type: string
                      description:
                        type: string
                      image:
                        description: "The name of the image to be deployed in the cluster"
                        type: string
                      secret-name:
                        description: "The name of the secret in K8s that will contain the secret value"
                        type: string
                      secret-env-var:
                        description: "The name of the environment variable that will contain the secret value"
                        type: string
    scope: Namespaced
    names:
      plural: applications
      singular: application
      kind: Application
      shortNames:
        - oramindapp
        - orapp
Now, create a sample yaml file like the following, and name it application.yaml . The name is not important, just note that you are going to use it later. Don’t apply this yet.
apiVersion: oramind.com/v1
kind: Application
metadata:
  name: oramindsampleapp
spec:
  application-name: Example Application
  description: This is an example application
  image: nginx:latest
  secret-name: oramind-application-secret
  secret-env-var: APPLICATION_SECRET
Now, let’s create our Java application using Quarkus. Use https://code.quarkus.io to generate a new Quarkus empty application and add the following extensions to it:
- Jackson
- Kubernetes client
Now that you have your application, let's start creating the models and logic. Let's create the model that corresponds to the application.yaml first.
@Group("oramind.com")
@Version("v1")
@Singular("application")
@Plural("applications")
public class Application extends CustomResource<Application.ApplicationSpec, Void> {

    public static class ApplicationSpec {
        @JsonProperty("application-name")
        private String applicationName;

        private String description;

        private String image;

        @JsonProperty("secret-name")
        private String secretName;

        @JsonProperty("secret-env-var")
        private String secretEnvVar;

        ///getters and setters below...
    }

    public static class ApplicationsList extends DefaultKubernetesResourceList<Application> {
    }
}
Note that apart from the Spec, we have also defined an ApplicationsList class as well. This is useful when fetching things with the Fabric8 client, as the resulting list fetched will now have the appropriate list type since we have defined it. We will be able to pass the type of the list to be returned in the queries done.
Then, let's define a service class that will spawn the watcher of those resources.
@ApplicationScoped
public class OperatorService {
    @Inject
    KubernetesClient client;


    public void onStartup(@Observes StartupEvent event) {
        client.v1()
                .resources(Application.class, Application.ApplicationsList.class)
                .watch(new ApplicationWatcher(client));

        var list = client.v1().resources(Application.class, Application.ApplicationsList.class).list();
        System.out.println("Applications: " + list.getItems());
    }
}
Then, let's implement the ApplicationWatcher class.
public class ApplicationWatcher implements Watcher<Application> {
    private static final Logger log = LoggerFactory.getLogger(ApplicationWatcher.class);


    KubernetesClient client;

    public ApplicationWatcher(KubernetesClient client) {
        log.info("watching applications...");
        this.client = client;
    }

    @Override
    public void eventReceived(Action action, Application resource) {
        ...
    }

    public void onModifyOrAddApp(Application resource){
        ...
    }

    private void onDeleteApp(Application resource) {
        ...
    }

    @Override
    public void onClose(WatcherException cause) {

    }

    //generate random 32-bit hash - you can have your own password generator here, this is just an example
    private String generateHash() {
        return String.format("%032x", new java.util.Random().nextLong());
    }
}
Let's implement the event receipt handler
@Override
public void eventReceived(Action action, Application resource) {
    switch (action.name()) {
        case "ADDED", "MODIFIED" -> onModifyOrAddApp(resource);
        case "DELETED" -> onDeleteApp(resource);
        case "ERROR" -> log.error("Error while watching OramindApplication: " + resource.getMetadata().getName());
    }
}
The following piece of code will add a Secret and a Deployment with this Secret as its environment variable.
    public void onModifyOrAddApp(Application resource){
        log.info("Oramind Application: " + resource.getMetadata().getName() + " has been added or modified");

        var spec = resource.getSpec();
        var secretName = spec.getSecretName();

        //creating the secret
        var newSecret = new SecretBuilder()
                .withNewMetadata()
                .withName(secretName)
                .endMetadata()
                .addToStringData("secret", generateHash())
                .build();
        client.resource(newSecret).inNamespace(resource.getMetadata().getNamespace()).createOrReplace();

        //creating the deployment
        var deployment = new DeploymentBuilder()
                .withNewMetadata()
                .withName(resource.getMetadata().getName())
                .withLabels(Map.of("oramind-app", resource.getMetadata().getName()))
                .endMetadata()

                .withNewSpec()
                .withReplicas(1)
                .withNewSelector()
                .addToMatchLabels("oramind-app", resource.getMetadata().getName())
                .endSelector()

                .withNewTemplate()
                    .withNewMetadata()
                        .addToLabels("oramind-app", resource.getMetadata().getName())
                    .endMetadata()
                    .withNewSpec()
                        .addNewContainer()
                        .withName("application")
                        .withImage(spec.getImage())
                        .addNewEnv()
                            .withName(spec.getSecretEnvVar())
                            .withNewValueFrom()
                                .withNewSecretKeyRef()
                                    .withName(spec.getSecretName())
                                    .withKey("secret")
                                .endSecretKeyRef()
                            .endValueFrom()
                        .endEnv()
                        .endContainer()
                    .endSpec()
                .endTemplate()
                .endSpec()
                .build();

        client.resource(deployment)
                .inNamespace(resource.getMetadata().getNamespace())
                .createOrReplace();


    }
And now let's implement the method to handle the deletion of our custom resource. When the Application resource gets deleted, we are removing both the generated Secret and the Deployment.
private void onDeleteApp(Application resource) {
        log.info("OramindApplication: " + resource.getMetadata().getName() + " has been deleted");
        var name = resource.getMetadata().getName();
        var namespace = resource.getMetadata().getNamespace();
        var app = client.apps().deployments().inNamespace(namespace).withName(name).get();
        var secret = client.secrets().inNamespace(namespace).withName(resource.getSpec().getSecretName()).get();
        if (app != null) {
            client.apps().deployments().inNamespace(namespace).withName(name).delete();
        }
        if (secret != null) {
            client.secrets().inNamespace(namespace).withName(resource.getSpec().getSecretName()).delete();
        }
    }
Fabric8 offers many types of builders for building your resources dynamically, even when you need to do this in line. The indentation was added by me above, to make it clearer how deep in the indentation level we are.
In the above example, note that we are retrieving the secrets to be deleted via their name. This is a very simplified query method, and is only used for the sake of brevity. In production environments, you should associate the Secret and the Deployment resource by using annotations or labels, and you should query them using those.
We are ready to perform the test.
- Run the application using
mvn compile quarkus:dev. - Now, run
kubectl apply -f application.yamlin your terminal - Watch the resource that will be created in Kubernetes.
- Our Kubernetes controller will pick the event of the resource addition, and will now create a secret and a Deployment in addition to the resource we just added! It will have also passed the secret as an environment variable inside the application. You can confirm this by looking at the deployment definition of the
Deploymentthat was automatically created. - Now, perform a
kubectl delete -f application.yamlin your terminal - Watch that the
Deploymentand theSecretare deleted as well as your resource. That's because our Controller handles the deletion as well.
And that's it! We have created our own basic Kubernetes Controller, by taking advantage of the Fabric8 Client and Quarkus.
If you want to take a look at the code, I have uploaded the full version here: https://github.com/csotiriou/kubernetes-operator-article-code
Operator Development Tips
It is highly recommended that when deploying to production, you should compile your Quarkus application to Native mode to minimize resource utilization. Once compiled, you can package it as a container image and deploy it within your cluster to ensure constant event monitoring. However, as this is outside the scope of this article, I suggest that you seek further guidance on this matter to ensure optimal performance and security of your production environment.
Always run a single instance of your operator. Do not scale its replicas to more than 1.
You should be very careful with the state of your Kubernetes cluster. All code fails and Controller code is no exception. When an operator boots, it will receive events for all things that you tell it to watch, even if the resources were created prior to the controller booting. That will allow you to not worry about missing create/update events. However, this is not the case with deletion events. There is a high chance that there are some resources deleted when your operator boots, which may have resulted in some associated resources not being treated. Your controller should query for those dangled resources, and make the necessary adjustments when booting.
When choosing your operator framework, you will need to make some decisions based on your knowledge, as well as your team's knowledge. Scripting languages give you the best flexibility when it comes to modifying and constructing resources. In the above example, our Deployment file could have been created using less lines of code using Python using the Kopf framework. We could have also avoided creating the entire custom model in Java prior to using it. However, I have found that when working with CRDs and Kubernetes resources, it pays off having everything statically typed - thus my choice of the Java language. It makes things more verbose, but it really pays off later when debugging and monitoring.
When choosing an operator technology, you should also consider the configurability of the framework you are using. You will need to deploy the operator in Kubernetes, and you will need to configure it using environment variables or ConfigMaps. Java-based frameworks come with batteries included in terms of configurability. You should think about that as well before choosing your technology.
Red Hat has been sponsoring the Java Operator SDK, which is based on the Fabric8 client. You should check this out as well if you are interested.
Conclusion
Through this article, we have delved into the fascinating world of Kubernetes CustomResourceDefinitions, and their association with an Operator. By following the best practices and utilizing the appropriate tools, you can create your very own Operator to streamline your Kubernetes deployment, automate your day-to-day tasks and make your Kubernetes cluster environment-aware.
The Kubernetes Operator pattern has proven to be one of the most valuable features of working with Kubernetes, allowing for endless possibilities and applications. With their scalability and flexibility, Kubernetes Operators have become essential for DevOps teams who want to take their container management to the next level.
Further Read
- Operators (also contains links to popular operator frameworks
- Java Operator Framework and https://blog.container-solutions.com/a-deep-dive-into-the-java-operator-sdk
- Custom Resource Definitions
- Fabric8 Kubernetes Client