Secure Kubernetes: Setting Up OpenID Connect w/ Apisix, Keycloak, Terraform

Intro
When constructing a microservices architecture, one essential component you'll need is an API Gateway. This server acts as an intermediary, fielding requests from clients who wish to access resources from your various microservices. Its primary role is to serve as the singular point of interaction for all client communications within your system, effectively directing requests to the correct backend services. An API Gateway enhances the security, performance, and scalability of your architecture by incorporating features like authentication, load balancing, and caching.
While smaller clusters might manage with a modified Nginx ingress controller, this solution falls short when security becomes a priority in your system's architecture.
During my initial exploration into enhancing my cluster, I focused on several key capabilities:
- Securing all endpoints with OpenID Connect: This modern authentication standard ensures secure and reliable verification mechanisms.
- Extensible API Gateway with plugins: The ability to add plugins allows for customized enhancements and integrations, tailoring the gateway to meet specific needs.
- Rapid deployment and teardown of infrastructure: Essential for dynamic environments, this feature supports agile practices and quick adaptations.
My journey into this field was marked by a series of trials and errors, and it took a significant amount of tinkering to find an approach that worked. Now, having navigated through these complexities, I aim to simplify these processes for you. This guide will break down each step to ensure that you not only understand how to implement these systems but also why each component is important.
The end goal is for you to not only replicate a functional development setup but also allow adaptation of this configuration according to your project's needs. Let’s get started and demystify the technical challenges, making your transition into using an API Gateway and Keycloak as smooth as possible.
Note: Throughout this tutorial, I will be using the domain k8s.orb.local as the access point to my cluster, facilitated by OrbStack, which simplifies some of the more cumbersome aspects of infrastructure setup, such as domain configuration for Kubernetes Ingress. Depending on your local setup and the tools you use, you might need to replace k8s.orb.local with something like http://localhost:<<your-kubernetes-port>>/rest/of/the/path.The architecture
In high level
Consider the following architecture
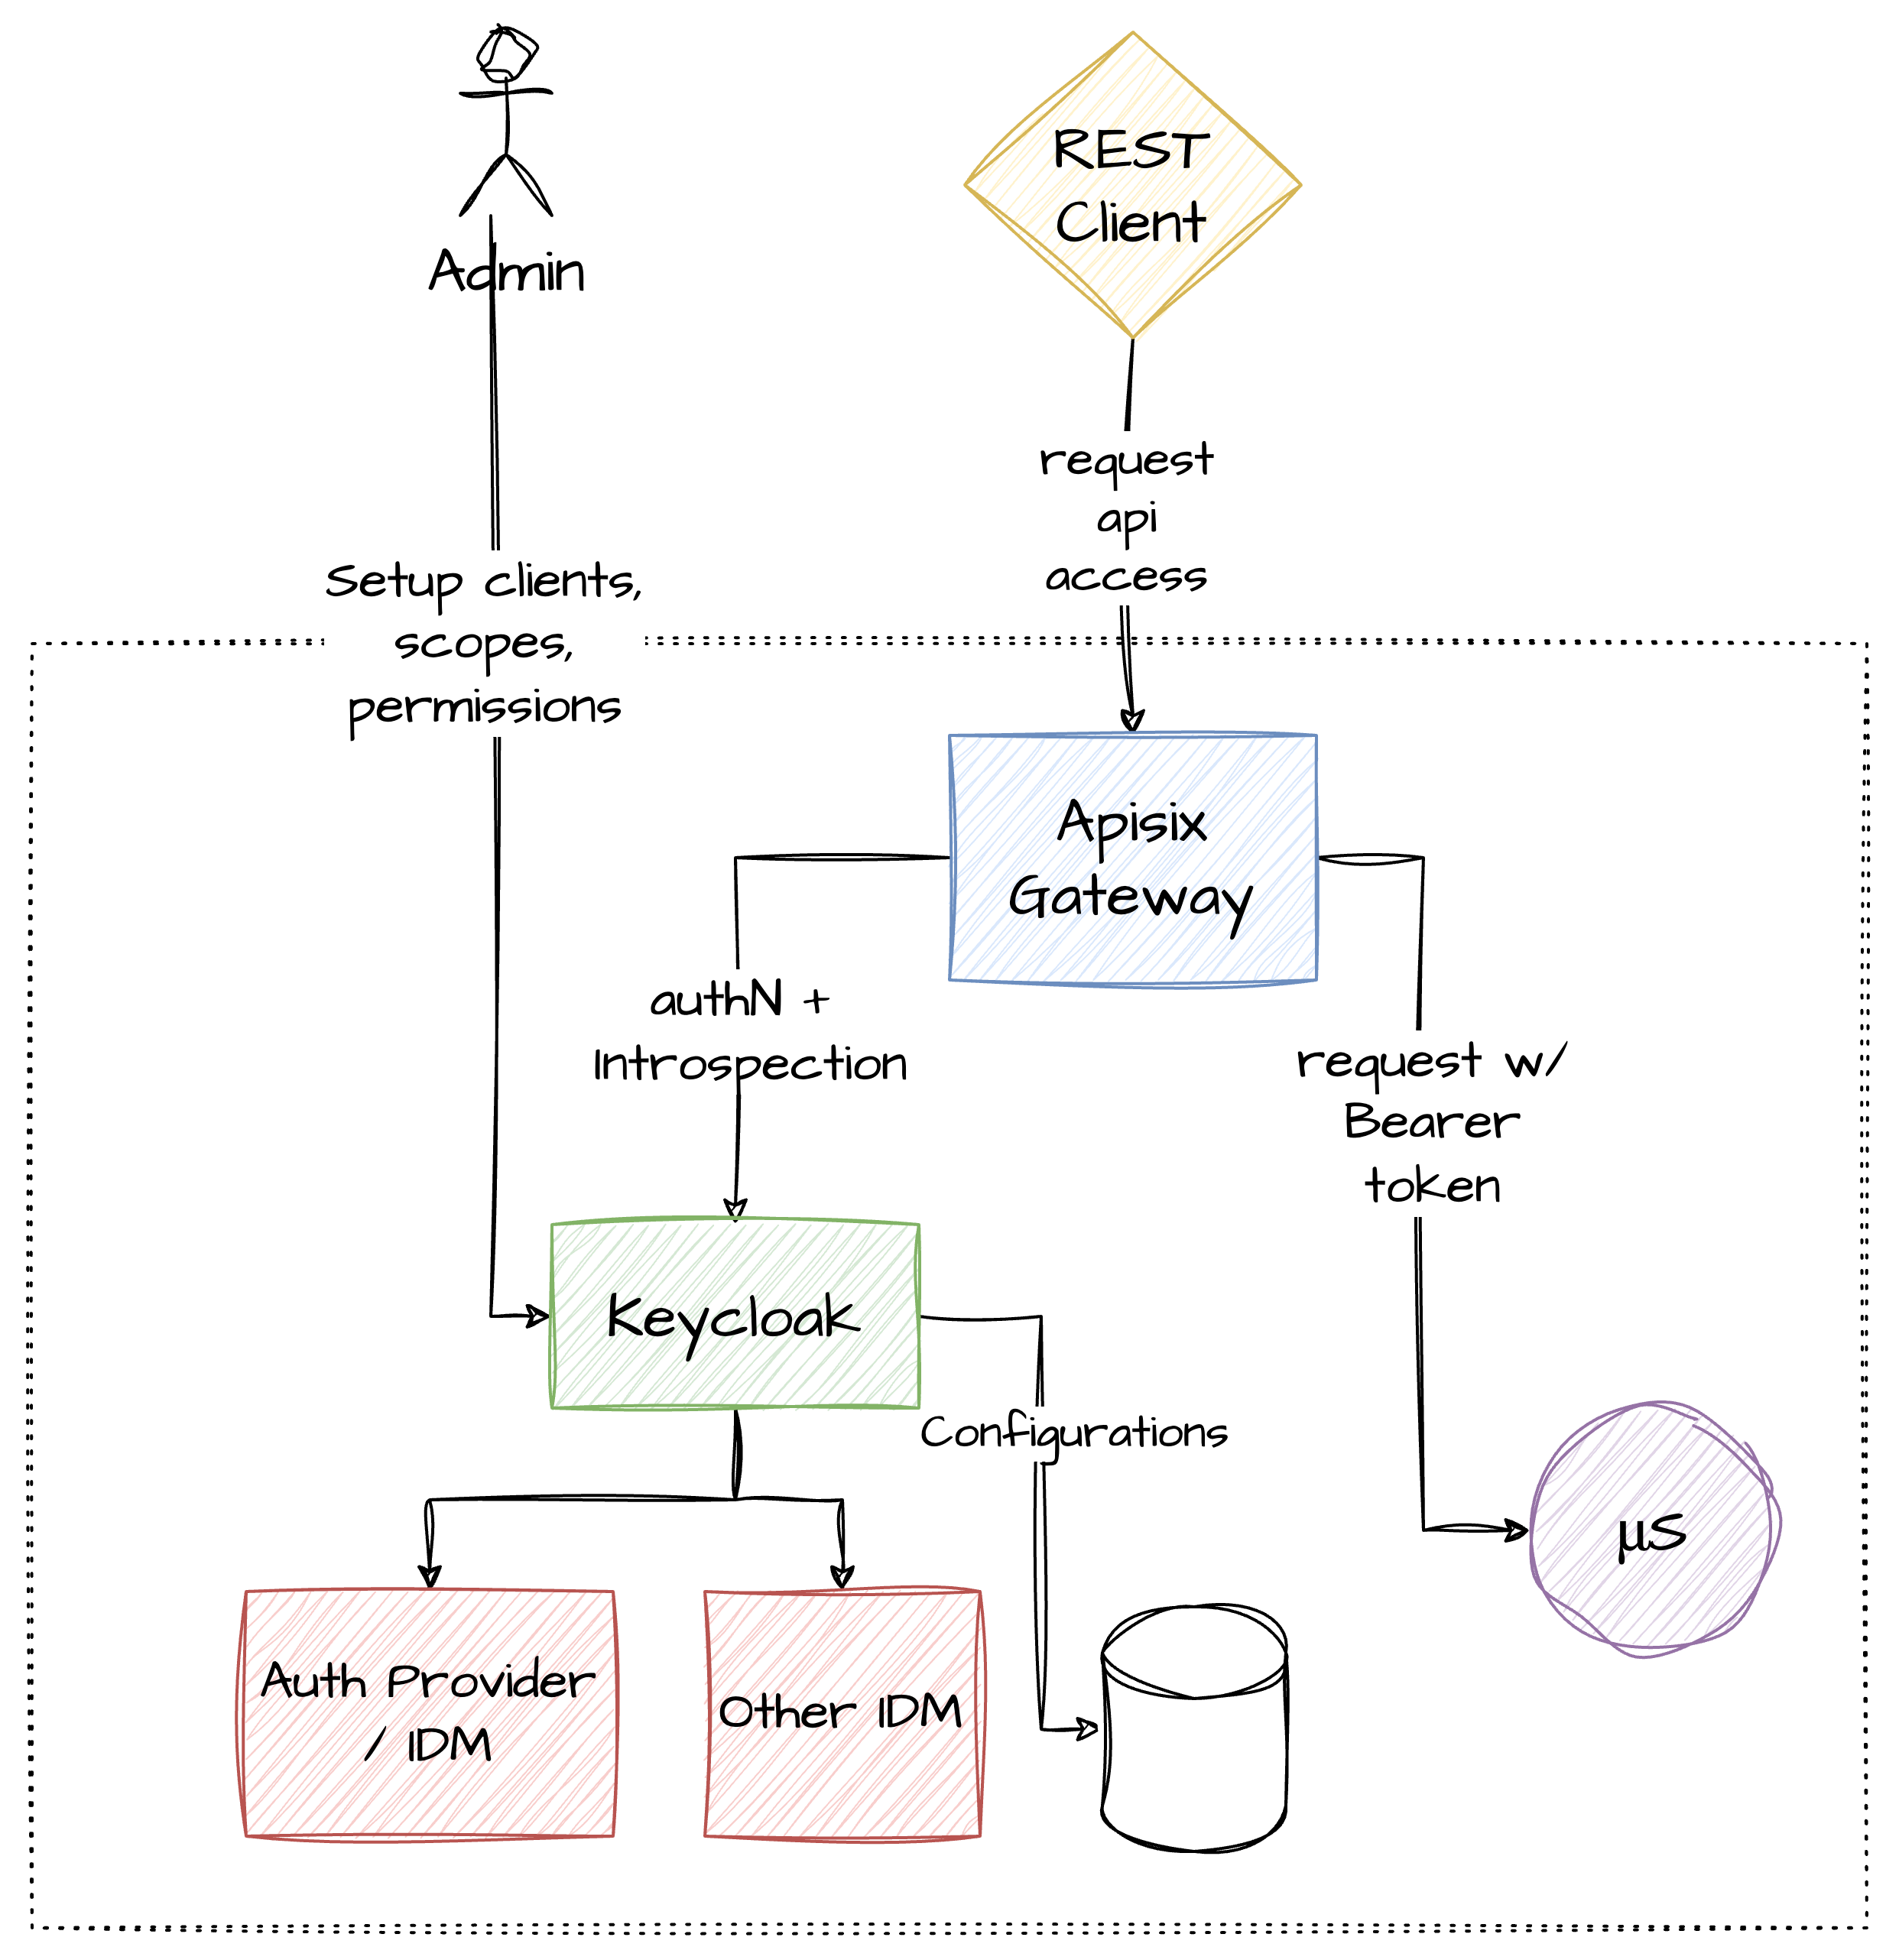
Let's break down the components and their interactions to understand how this setup effectively manages authentication and routing in a microservices environment.
- API Gateway: The API Gateway is the critical entry point for all client requests in our system. It serves multiple purposes:
- Routing: Directs requests to the appropriate microservice.
- Aggregation: Combines data from multiple services.
- Authentication: Verifies user credentials and forwards authenticated requests.
- Load Balancing: Distributes incoming network traffic across multiple backend services to ensure reliability and availability.
- Identity Provider (Keycloak): Keycloak acts as the centralized system for authenticating and authorizing user access across all services.
- Single Identity Provider: For simplicity, we use Keycloak alone to handle all identity management tasks in this setup.
- Extensibility: In a more complex setup, Keycloak could interface with other in-house identity management systems (IDMs), leveraging its ability to support multiple authentication protocols and expose OpenID Connect (OIDC) endpoints.
- Enterprise Integration: Typically, Keycloak would be integrated with an enterprise's IDM, enhancing its capabilities with Keycloak's extensive support for modern identity protocols and features.
- Resource Server: This component represents the microservices in your architecture. Each microservice:
- Handles specific business logic related to a particular function of the application.
- Responds to requests from the API Gateway, which have been authenticated and authorized by Keycloak.
Operational Flow:
- OIDC Credential Management: Administrators generate OIDC credentials (client IDs and secrets) that are used by the API Gateway.
- Token Introspection: The API Gateway utilizes these credentials to log in to the IDM (Keycloak) on behalf of users and to introspect OIDC tokens through Keycloak’s OIDC Introspection endpoints.
- Security and Compliance: This setup ensures that only authenticated and authorized requests are processed by the microservices, maintaining security and compliance across the system.
Benefits of This Architecture:
- Centralized Security Management: Keycloak centralizes user management, making it easier to manage security policies and access controls.
- Scalability: The API Gateway facilitates the scaling of authentication mechanisms as more microservices are added to the system.
- Flexibility: Keycloak's compatibility with various identity protocols allows for easy integration with existing enterprise systems.
Considerations for Implementation:
- Configuration Complexity: Setting up Keycloak and integrating it with an API Gateway requires careful configuration to ensure secure and efficient operation.
- Performance Optimization: Ensure the API Gateway is optimized to handle high volumes of traffic without becoming a bottleneck.
- Security Audits: Regularly review and update security configurations to address new vulnerabilities and ensure compliance with current security standards.
Infrastructure setup
In this section, we will explore the key software components selected for our API gateway and identity management implementation. These tools are chosen for their robustness, flexibility, and extensive feature sets. They also follow industry standards and allow for easy installation in Kubernetes clusters.
Apisix
Apache Apisix is a dynamic, open-source API gateway built on NGINX and provides extensive features out of the box. Known for its robustness, Apisix includes a plugin-based architecture which allows for significant customization and extension. Developers familiar with OpenResty will find the plugin system intuitive, as it allows for scripting in Lua to tailor functionality according to specific requirements.
For the purposes of this guide, we will utilize Apisix in its Ingress Controller form. This enables the configuration of routes using Kubernetes resources, allowing for a more nuanced and feature-rich approach than what is offered by standard Ingress resources. We will primarily focus on leveraging ApisixRoute and ApisixPlugin custom resources to manage our services more effectively.
Terraform
Terraform by HashiCorp is a powerful tool for defining and managing infrastructure as code. It eliminates many of the manual processes involved in managing infrastructure, making it easier to deploy and maintain consistent environments. Terraform's ability to manage the state of your infrastructure also helps in avoiding conflicts and ensuring that deployments are predictable and repeatable.
In our implementation, Terraform will be instrumental in setting up and tearing down the necessary infrastructure components swiftly. This capability is particularly valuable in testing environments where configurations need to be adjusted frequently to evaluate different scenarios.
As a DevOps purist might point out, Terraform is traditionally intended for orchestrating infrastructure across cloud providers, not for managing Kubernetes resources. However, in the context of setting up a development environment that allows for the easy and automatic recreation of proof of concepts, I believe it's perfectly reasonable to stretch Terraform's usual applications. By bending the rules this way, we significantly enhance our toolchains, making our development processes not only more efficient but also more adaptable to our needs.
Keycloak
Keycloak is an open-source Identity and Access Management (IAM) tool that provides ease of integration with practically no need to write extensive custom code. It supports single sign-on with Identity Providers, social login, and enterprise identity management capabilities. Keycloak fits perfectly into our architecture by providing robust security features and flexible access control mechanisms, suitable for various compliance requirements.
We will integrate Keycloak to handle authentication and authorization for our services. This integration ensures that our applications are protected with modern security standards, making it easier to manage user access and adhere to new security policies efficiently.
Implementing the Infrastructure
To bring these components together:
- Apisix Setup:
- Deploy Apisix as a Kubernetes Ingress Controller.
- Configure
ApisixRouteandApisixPluginfor advanced routing and plugin management.
- Terraform Deployment:
- Use Terraform scripts to provision and manage the underlying infrastructure for Apisix and Keycloak.
- Ensure that the infrastructure can be dynamically adjusted as needed for development and testing.
- Keycloak Configuration:
- Set up Keycloak to manage user identities and access controls.
- Integrate Keycloak with Apisix to secure the API endpoints through robust authentication protocols.
Implementation
A fair bit of warning: The scope of this article is to setup a local development cluster for testing your infrastructure, develop custom plugins for Apisix and Keycloak. It is by no means a complete production setup.
Setting up terraform
For the sake of brevity, I am omitting the content of variables files. The contents are available in the sample code that accompanies this post.
Inside an empty folder, create a main.tf file, and put the following contents.
terraform {
  required_providers {
    kubectl = {
      source = "alekc/kubectl"
      version = ">= 2.0.2"
    }
  }
}

provider "helm" {
  kubernetes {
    config_path = var.kubeconfig.path
    config_context = var.kubeconfig.default_context
  }
}

provider "kubernetes" {
  config_path = var.kubeconfig.path
  config_context = var.kubeconfig.default_context
}

provider "kubectl" {
  config_path =  var.kubeconfig.path
  config_context = var.kubeconfig.default_context
}
Those will be the minimum providers we will use across all our infrastructure. Note the usage of alekc/kubectl provider for kubectl. This will allow us to avoid many issues when creating Custom Resources. One of those is the fact that Terraform needs to statically check the existence of Custom Resources using kubernetes_manifest resource during the planning phase. However, some Custom Resources will be created during the apply phase, therefore causing an error. alekc/kubectl allows us to avoid this issue and many others. Check the provider documentation here.
Installing Keycloak
Let’s walk through the process of installing Keycloak using Terraform. Before we dive into the actual Terraform setup, we’ll need to generate some necessary security keys as recommended by Keycloak’s official documentation. These keys will be used for the secure installation of Keycloak.
openssl req -subj '/CN=test.keycloak.org/O=Test Keycloak./C=US' -newkey rsa:2048 -nodes -keyout key.pem -x509 -days 365 -out certificate.pemAs Keycloak does not offer official Helm charts for installation, we will use the Keycloak Operator to manage the deployment on Kubernetes. The Keycloak Operator also lacks direct Helm chart support, but it can be installed using kubectl apply commands as per the official documentation.
Therefore, we will need to translate this to Terraform and take into account both the create phase (when running apply) but also the destroy phase, when we are about to tear down the entire cluster. In the destroy phase, we will run the kubectl commands in reverse. The best resource for doing this in terraform is null_resource, which is actually generating... nothing at all, so that you can take advantage of the provisioners to run custom commands and install what you want.
resource "kubernetes_namespace_v1" "keycloak_namespace" {
  metadata {
    name = "keycloak"
  }
}

resource "null_resource" "install_keycloak_operator_script" {
  depends_on = [kubernetes_namespace_v1.keycloak_namespace]

 . #this will run when you are using terraform apply
  provisioner "local-exec" {
    when    = create
    command = <<COMMAND
kubectl apply -f https://raw.githubusercontent.com/keycloak/keycloak-k8s-resources/24.0.5/kubernetes/keycloaks.k8s.keycloak.org-v1.yml
kubectl apply -f https://raw.githubusercontent.com/keycloak/keycloak-k8s-resources/24.0.5/kubernetes/keycloakrealmimports.k8s.keycloak.org-v1.yml
kubectl apply -f https://raw.githubusercontent.com/keycloak/keycloak-k8s-resources/24.0.5/kubernetes/kubernetes.yml -nkeycloak
    COMMAND
  }

# this will run when using terraform destroy
  provisioner "local-exec" {
    when = destroy
    command = <<COMMAND
kubectl delete -f https://raw.githubusercontent.com/keycloak/keycloak-k8s-resources/24.0.5/kubernetes/kubernetes.yml -nkeycloak
kubectl delete -f https://raw.githubusercontent.com/keycloak/keycloak-k8s-resources/24.0.5/kubernetes/keycloakrealmimports.k8s.keycloak.org-v1.yml
kubectl delete -f https://raw.githubusercontent.com/keycloak/keycloak-k8s-resources/24.0.5/kubernetes/keycloaks.k8s.keycloak.org-v1.yml
COMMAND
  }
}
Then, you will need to setup some components before telling the Keycloak operator to install keycloak. The following Terraform code will
- Install a database username and password as a
Secretin Kubernetes for installation of Postgres - Install the Postgres database that will be used by Keycloak to operate. The contents of the yaml file is omited for the sake of brevity.
- Will install the certificates that we created earlier as
Secretsin Kubernetes
resource "kubernetes_secret_v1" "keycloak_db_secret" {
  depends_on = [null_resource.install_keycloak_operator_script]
  type = "Opaque"
  metadata {
    name = "keycloak-db-secret"
    namespace = kubernetes_namespace_v1.keycloak_namespace.metadata.0.name
  }
  data = {
    username = "keycloak"
    password = "keycloak"
  }
}

resource "kubernetes_secret_v1" "keycloak_certificate" {
  metadata {
    name = "keycloak-certificate"
    namespace = kubernetes_namespace_v1.keycloak_namespace.metadata.0.name
  }
  data = {
    "tls.crt" = file("./config/keycloak/certificate.pem")
    "tls.key" = file("./config/keycloak/key.pem")
  }
  type = "kubernetes.io/tls"
}

resource "helm_release" "keycloak_postgres" {
  depends_on = [null_resource.install_keycloak_operator_script]
  chart = "postgresql"
  name  = "keycloak-postgres"
  namespace = kubernetes_namespace_v1.keycloak_namespace.metadata.0.name
  repository = "https://charts.bitnami.com/bitnami"
  values = [file("./config/keycloak/keycloak-postgres.yaml")]
}
And finally we will install Keycloak by creating a Keycloak Custom Resource in our Kubernetes Cluster. In the case presented below, we define a very basic keycloak installation, with most of the security features disabled, since we only need this for development purposes.
resource "kubectl_manifest" "keycloak_installation" {
  depends_on = [helm_release.keycloak_postgres, null_resource.install_keycloak_operator_script]
  yaml_body = <<YAML
apiVersion: k8s.keycloak.org/v2alpha1
kind: Keycloak
metadata:
  name: main-keycloak
  namespace: ${kubernetes_namespace_v1.keycloak_namespace.metadata.0.name}
spec:
  instances: 1
  http:
    httpEnabled: true
    httpPort: 8080
  hostname:
    strict: false
    strictBackchannel: false
  ingress:
    enabled: false
  db:
    vendor: postgres
    host: keycloak-postgres-postgresql
    usernameSecret:
      name: ${kubernetes_secret_v1.keycloak_db_secret.metadata.0.name}
      key: username
    passwordSecret:
      name: ${kubernetes_secret_v1.keycloak_db_secret.metadata.0.name}
      key: password
  log:
    logLevel: TRACE
YAML
}
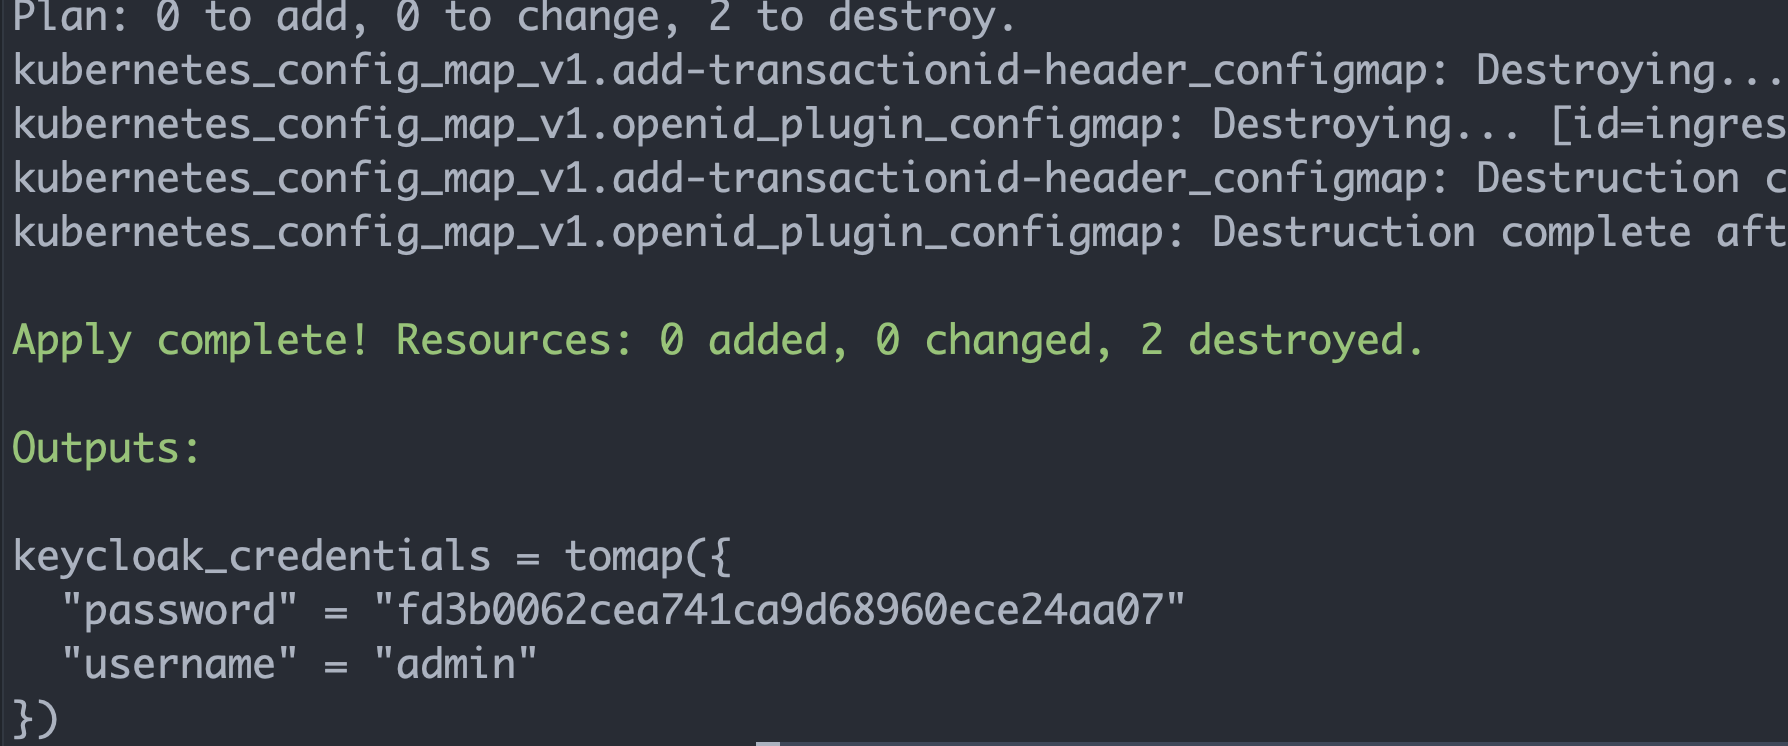
Bonus: When Keycloak is initially installed, it generates a pair of credentials for admin users to log in, and keeps those credentials under a secret named main-keycloak-initial-admin. Since we know this, we can write some Terraform code to have our scripts output those credentials for us after installation is finished.
data "kubernetes_secret_v1" "initial_keycloak_credentials" {
  metadata {
    name = "main-keycloak-initial-admin"
    namespace = kubernetes_namespace_v1.keycloak_namespace.metadata.0.name
  }
}

output "keycloak_credentials" {
  value = nonsensitive(data.kubernetes_secret_v1.initial_keycloak_credentials.data)
}
Installing Apisix Ingress Controller
Apisix has a very elaborate Helm Charts structure that we can use with Terraform and connect with Keycloak. We are going to use this to install Apisix in our infrastructure.
resource "kubernetes_namespace_v1" "apisix_namespace" {
    metadata {
        name = "ingress-apisix"
    }
}

resource "helm_release" "apisix_helm" {
  depends_on = [kubernetes_config_map_v1.custom_response_plugin_configmap, kubernetes_config_map_v1.openid_plugin_configmap,
    kubernetes_config_map_v1.add-clientid-header_configmap, kubernetes_config_map_v1.add-transactionid-header_configmap]
  chart = "${path.module}/config/apisix/apisix-helm-chart-master/charts/apisix"
  name  = "apisix"
  repository = "https://charts.apiseven.com"
  namespace = kubernetes_namespace_v1.apisix_namespace.metadata.0.name
  dependency_update = true
  force_update = true
  values = [
    file("config/apisix/apisix-values.yaml"),
  ]
}
The values.yaml for Apisix is the following yaml, which is self-explanatory. The gateway type is set up to be LoadBalancer, so that the Kubernetes Service that will be created is of type LoadBalancer . For my setup, this is important, because it will allow OrbStack (which I am using) to expose it to the domain orb.k8s.local on my computer. Change this according to your own local domain name and preferences.
gateway:
  type: LoadBalancer
ingress-controller:
  enabled: true
  config:
    apisix:
      serviceNamespace: ingress-apisix
admin:
  allow:
    ipList:
      - "0.0.0.0/0"


etcd:
  replicaCount: 1
logs:
  errorLogLevel: "debug"
You may be wondering why I opted to use a local chart loaded from my local disk and not just use the apisix chart as I am doing with the rest of the Helm Charts in this guide. Well, there is a. good reason for that. It seems that there are some things in Terraform's implementation of Helm Charts providers which make it not always work correctly with complicated Helm Charts with a lot of dependencies - among other issues. In my case, loading from a disk corrects an issue of Terraform not respecting the values of the values.yaml file. If anyone reading this has a better solution, or if the problem has been fixed by Terraform, don't hesitate to tell me so in the comments.
Configuring Keycloak
It's time to set up Keycloak and start integrating it with our infrastructure for testing and other necessary tasks.
If you've followed the steps correctly, your Terraform script should yield output similar to what you might see in a screenshot, showing the initial administrator credentials. Make sure to copy these credentials; they are vital for accessing the Keycloak admin panel.
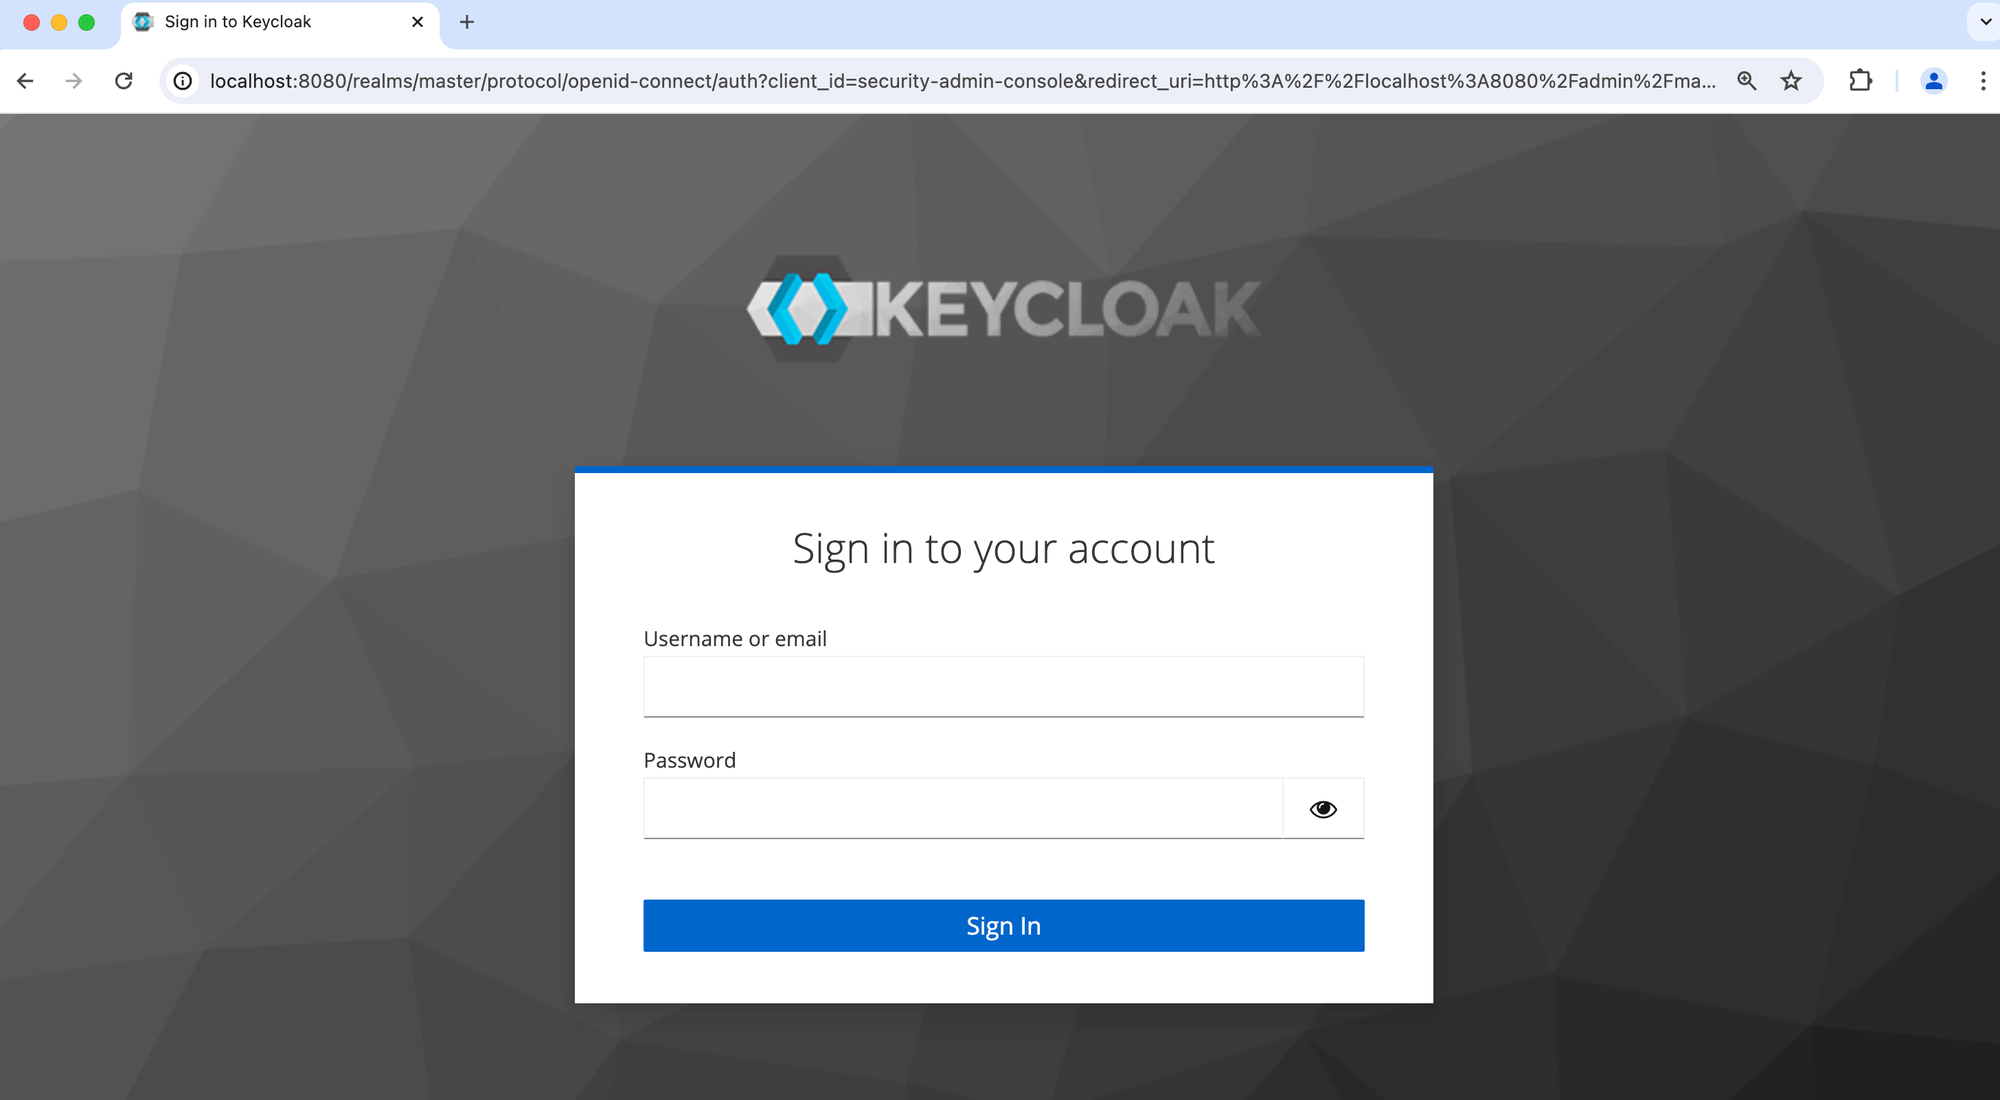
Next, to configure Keycloak from your local machine, use the following command in your terminal to proxy the Keycloak admin console:
Next, to configure Keycloak from your local machine, use the following command in your terminal to proxy the Keycloak admin console:
kubectl port-forward service/main-keycloak 8080:8080
Then, navigate to http://localhost:8080 in your web browser. You should see the Keycloak login page, similar to another screenshot you might have.
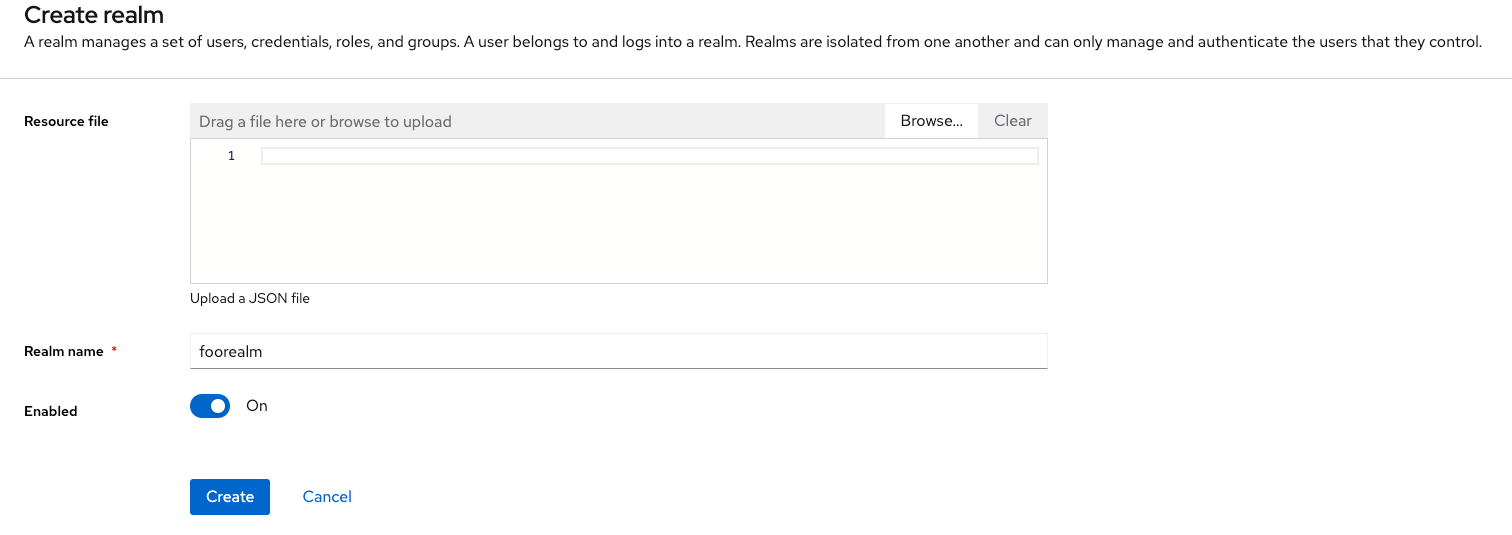
The first step in Keycloak is to create a new realm for managing your authentication entities. Name this realm "foorealm." This realm will centralize all our authentication mechanisms and configurations.
After setting up the realm, it's time to create a new client specifically for APISIX to connect to Keycloak. This is crucial as this client will handle the authentication requests from APISIX, not the end-users directly.
This client will be the client that Apisix itself will use to connect to Keycloak. It will NOT be the client that the end user will use to obtain a new token. This is an important distinction that we need to always keep in mind.
Here’s how to proceed:
- Click on the "Create Client" button.
- Configure the new client with the following settings:
- General Settings:
- Client type: Choose "OpenID Connect."
- Client ID: Set this to
apisix.
- Capability Config:
- Client Authentication: Ensure this is enabled.
- Authentication Flow: Turn on the "Service Accounts Roles" option. This is necessary for enabling
client_credentialsauthentication method.
- General Settings:
Leave the rest of the settings in their default state unless specific adjustments are required for your setup.
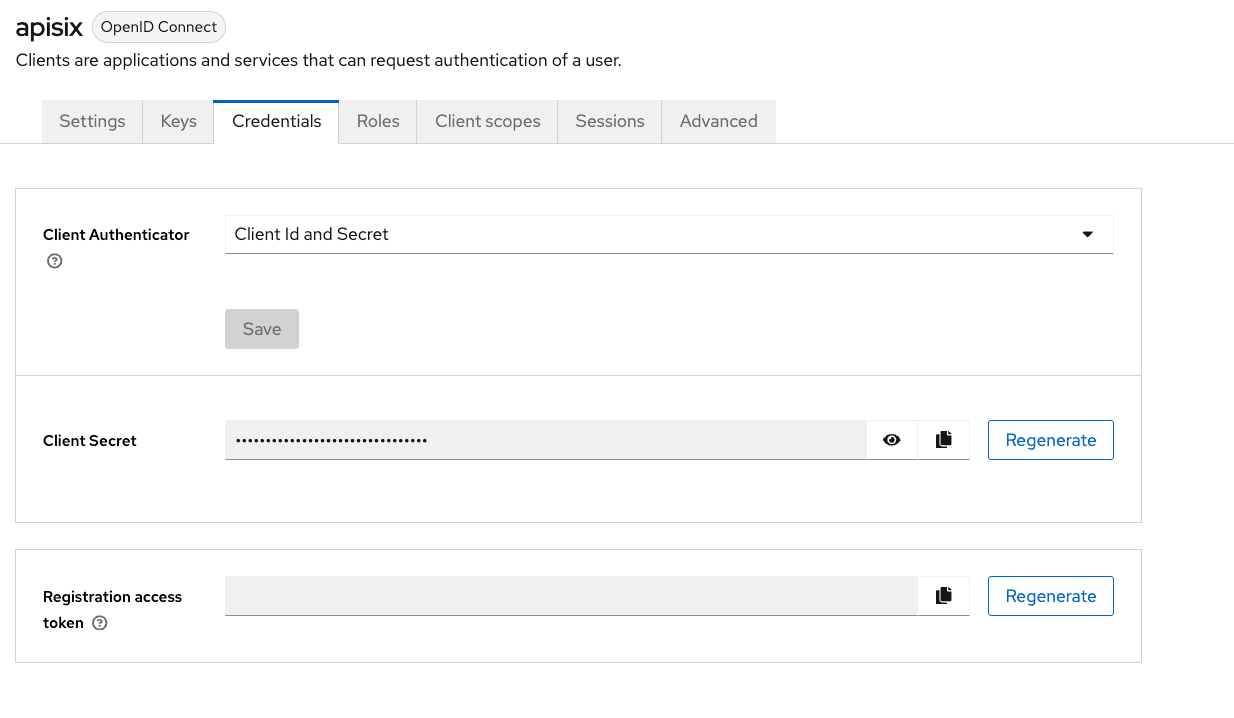
Finally, in the Credentials tab of your newly created client, make sure to copy the client's credentials. You'll need the Client ID (which you've set earlier) for further configurations in APISIX. This setup forms the foundation of the authentication flow between your services and Keycloak, ensuring a secure and efficient management of access permissions.
Using Keycloak's Endpoints
Now that we have set up our realm, let's verify our configuration by testing it. Open a terminal and visit the following URL: http://localhost:8080/realms/foorealm/.well-known/openid-configuration
If everything is set up correctly, you should see something like this:
{
  "issuer": "http://localhost:8080/realms/foorealm",
  "authorization_endpoint": "http://localhost:8080/realms/foorealm/protocol/openid-connect/auth",
  "token_endpoint": "http://localhost:8080/realms/foorealm/protocol/openid-connect/token",
  "introspection_endpoint": "http://localhost:8080/realms/foorealm/protocol/openid-connect/token/introspect",
  "userinfo_endpoint": "http://localhost:8080/realms/foorealm/protocol/openid-connect/userinfo",
  "end_session_endpoint": "http://localhost:8080/realms/foorealm/protocol/openid-connect/logout",
  "jwks_uri": "http://localhost:8080/realms/foorealm/protocol/openid-connect/certs",
  "check_session_iframe": "http://localhost:8080/realms/foorealm/protocol/openid-connect/login-status-iframe.html",
  "grant_types_supported": [
    "authorization_code",
    "implicit",
    "refresh_token",
  ............
  }
This output is the standard OpenID Connect info endpoint, describing all available endpoints. Now, let's test the Login method with the token_endpoint.
curl -X "POST" "http://localhost:8080/realms/foorealm/protocol/openid-connect/token" \
     -H 'Content-Type: application/x-www-form-urlencoded; charset=utf-8' \
     --data-urlencode "client_id=apisix" \
     --data-urlencode "client_secret=<<client secret>>" \
     --data-urlencode "grant_type=client_credentials"
If the setup is correct, you will receive a response like this:
{
  "access_token": "token here...",
  "expires_in": 300,
  "refresh_expires_in": 0,
  "token_type": "Bearer",
  "not-before-policy": 0,
  "scope": "profile email"
}
Bybassing security considerations (for development)
Let’s decode the access_token at jwt.io and look closely at the details. You might notice that the issuer field points to the Keycloak hostname inside Kubernetes:
{
  "exp": 1719727347,
  "iat": 1719727047,
  "jti": "c5d25c10-f5df-49ae-a7c9-63ead637beb3",
  "iss": "http://main-keycloak-service.keycloak.svc.cluster.local:8080/realms/foorealm", <<<-------------
  "aud": "account",
Well, it seems that the issuer field is set to the hostname of keycloak inside Kubernetes. This happens (and is allowed in our setup), since in the Keycloak Operator we have specifically set our security policies to be very lenient, and discard the strict backchannel.
hostname:
  strict: false
  strictBackchannel: false
This flexibility introduces serious security considerations and functional issues. As Keycloak’s documentation explains, if the iss field doesn’t match the host requesting token introspection, services using the token might face introspection errors and unauthorized access denials—even with a valid token.
To address these challenges, I've implemented a Keycloak proxy to act as a reverse proxy. This setup not only helps us avoid introspection errors by ensuring a consistent host in the Host header but also hides the actual location of the Keycloak service from token consumers.
Note: Remember, the current setup is designed for demo/development purposes and isn't suitable for production without further modifications. Always consult your security department to tailor the best practices for your deployment.
Bringing it all together
Now that we have tested everything, we will need to setup properly Apisix to obtain the token via it, and also a secured route to verify that our token has been passed correctly. First of all, let's install a Resource Service. This will be a our hypothetical main service, the one we will want to protext with OIDC Credentials
First of all, let's install an "echos server" using docker's ealen/echo-server docker image, whose response is an analysis of the request received. This will create a namespace named echonamespace1, and it will create a Deployment and a Service there for accessing .
resource "kubernetes_namespace_v1" "echonamespace1" {
metadata {
    name = "echonamespace1"
  }
}

resource "kubernetes_deployment_v1" "echodeployment1" {
  metadata {
    name = "echodeployment1"
    labels = {
      app = "echo1"
    }
    namespace = kubernetes_namespace_v1.echonamespace1.metadata.0.name
  }
  spec {
    replicas = "1"
    selector {
      match_labels = {
        app = "echo1"
      }
    }
    template {
      metadata {
        labels = {
          app = "echo1"
        }
      }
      spec {
        container {
          image = "ealen/echo-server"
          name = "application"
          port {
            container_port = 80
          }
        }
      }
    }
  }
}

resource "kubernetes_service_v1" "echoserver1" {
  metadata {
    name = "echoserver1-service"
    namespace = kubernetes_deployment_v1.echodeployment1.metadata.0.namespace
  }

  spec {
    selector = {
      app = "echo1"
    }

    port {
      port        = 80
      target_port = 80
    }

    type = "ClusterIP"
  }
}
Now that the echo server is deployed and running, it's time to expose it through the Apisix API Gateway using ApisixRoute. While the standard Kubernetes Ingress could be used, ApisixRoute provides more extensive configurability and is better suited for leveraging Apisix's powerful plugins and unique features.
resource "kubectl_manifest" "echoserver1_route" {
  yaml_body = <<YAML
apiVersion: apisix.apache.org/v2
kind: ApisixRoute
metadata:
  name: echoservice1
  namespace: ${kubernetes_namespace_v1.echonamespace1.metadata.0.name}
spec:
  http:
  - name: echo1
    match:
      paths:
        - "/echo1"
    backends:
      - serviceName: echoserver1-service
        servicePort: 80
YAML
}
If everything has been set up correctly, visiting http://k8s.orb.local/echo1 (make sure to replace the domain with the one that matches your own configuration and exposed ingress) should yield the expected results.
{
  "host": {
    "hostname": "k8s.orb.local",
    "ip": "::ffff:192.168.194.72",
    "ips": []
  },
  "http": {
............ more output here...
That means the API exposure is functioning correctly, and we're on the right track! Building on the same principles, let's also add another route to expose Keycloak's login methods using our realm, and its specific login methods for this realm.
resource "kubectl_manifest" "apisix-keycloak-login-route" {
  yaml_body = <<YAML
apiVersion: apisix.apache.org/v2
kind: ApisixRoute
metadata:
  name: login-apisix
  namespace: keycloak
spec:
  http:
  - name: loginhttp
    match:
      paths:
        - "/openid-connect/.well-known/openid-configuration"
        - "/openid-connect/auth/token"
    backends:
      - serviceName: keycloak-proxy
        servicePort: 80
    plugins:
    - name: proxy-rewrite
      enable: true
      config:
        regex_uri:
          - ^/openid-connect/auth/token$
          - /realms/foorealm/protocol/openid-connect/token
          - ^/openid-connect/.well-known/openid-configuration$
          - /realms/foorealm/.well-known/openid-configuration
YAML
}
You might have noticed that we're using the APISIX proxy-rewrite plugin to adjust the URLs sent from the client. Specifically, we're using the regex_uri parameter, which uses an array of pairs to direct how APISIX should proxy requests. Here's how it works:
- URLs matching
^/openid-connect/auth/token$are rewritten to/realms/foorealm/protocol/openid-connect/tokenbefore reaching Keycloak. - URLs matching
^/openid-connect/.well-known/openid-configuration$are rewritten to/realms/foorealm/.well-known/openid-configurationat Keycloak.
Now, let's test this configuration by accessing our login routes. I've already set up a new client credentials pair in Keycloak under the client name testclient to facilitate this test.
# request:
curl -X POST --location "http://k8s.orb.local/openid-connect/auth/token" \
    -H "Content-Type: application/x-www-form-urlencoded; charset=utf-8" \
    -d 'client_id=testclient&client_secret=j6bTL362xg6R48OOlL9TwUqMLDs63wDd&grant_type=client_credentials&scope=openid'

# response:
{
  "access_token": "token here...",
  "expires_in": 300,
  "refresh_expires_in": 0,
  "token_type": "Bearer",
  "not-before-policy": 0,
  "scope": "profile email"
}
If the output matches our expectations, we're ready to proceed with securing a route using APISIX. Now, let's focus on adding authorization. We'll do this by creating another ApisixRoute specifically for that purpose. This will ensure that our setup is secure and ready for repeated use.
resource "kubectl_manifest" "echoserver1_authenticated_route" {
  yaml_body = <<YAML
apiVersion: apisix.apache.org/v2
kind: ApisixRoute
metadata:
  name: echoserver-authenticated
  namespace: ${kubernetes_namespace_v1.echonamespace1.metadata.0.name}
spec:
  http:
  - name: echohttpauthenticated
    match:
      paths:
      - "/protected*"
    backends:
    - serviceName: echoserver1-service
      servicePort: 80
    plugins:
      - name: "openid-connect"
        enable: true
        config:
          client_id: "${var.client_configs.apisix.client_id}"
          client_secret: "${var.client_configs.apisix.client_secret}"
          discovery: "http://keycloak-proxy.keycloak.svc.cluster.local/realms/foorealm/.well-known/openid-configuration"
          token_endpoint: "http://keycloak-proxy.keycloak.svc.cluster.local/realms/foorealm/protocol/openid-connect/token"
          introspection_endpoint: "http://keycloak-proxy.keycloak.svc.cluster.local/realms/foorealm/protocol/openid-connect/token/introspect"
          bearer_only: true
          realm: "apisixrealm"
YAML
}
There's a lot going on in this setup, and it's important to break it down for clarity:
- Path Listening: We are configuring APISIX to listen to any requests that hit
/protected*. All these requests will be redirected to theechoservice1-service. - Using the OpenID Connect Plugin: We are implementing authentication using the OpenID Connect plugin on APISIX. Here's the key information we're configuring:
client_id: This is the identifier APISIX uses to authenticate with Keycloak. It's crucial to understand that this is not the same as the client_id used by the clients accessing your service.client_secret: This is the secret associated with theclient_idmentioned above.bearer_only: This setting specifies that the communication is strictly between services, using token introspection to validate access.realm,token_endpoint, andintrospection_endpoint: These are specific to Keycloak and are configured to manage token generation and introspection. We provide the internal cluster addresses for these endpoints, as both APISIX and Keycloak are within the same cluster, facilitating direct communication.
This configuration ensures that all accesses to the /protected* paths are securely managed and authenticated through Keycloak, leveraging APISIX's capabilities to enforce security policies effectively.
Recap: An API Gateway with Keycloak Authentication
Congratulations on setting up a streamlined API Gateway using Apache APISIX and securing it with Keycloak! This tutorial has taken you through the steps to integrate a robust authentication mechanism using OpenID Connect to protect your microservices.
Summary of the Setup
- API Gateway Configuration: We configured APISIX to handle requests to protected paths, enforcing authentication through Keycloak.
- Testing Authorization:
- Unauthorized Request: Attempting to access a protected resource without an authorization token results in a
401 Authorization Requirederror, demonstrating the effectiveness of our security setup. - Authorized Request: By acquiring a token from Keycloak and including it in the request, we gain access to the protected resource, confirming that our authentication flow works as expected.
- Unauthorized Request: Attempting to access a protected resource without an authorization token results in a
For the following request: http://k8s.orb.local/protected/echo1, you will now get the following response which is now generated by Apisix, since it doesn't find any Authorization header in the request being made.
<html>
<head><title>401 Authorization Required</title></head>
<body>
<center><h1>401 Authorization Required</h1></center>
<hr>
<center>openresty</center>
<p><em>Powered by <a href="https://apisix.apache.org/">APISIX</a>.</em></p></body>
</html>
Whereas the following request
## get a new access_token
curl -X POST --location "http://k8s.orb.local/openid-connect/auth/token" \
    -H "Content-Type: application/x-www-form-urlencoded; charset=utf-8" \
    -H "Host: k8s.orb.local" \
    -d 'client_id=testclient&client_secret=j6bTL362xg6R48OOlL9TwUqMLDs63wDd&grant_type=client_credentials&scope=openid'

## retrieve response, copy the access_token
curl -X GET --location "http://k8s.orb.local/protected/echo1" \
    -H "Authorization: Bearer <<token copied from the previous request>>"
Key Takeaways
- Fast Iterations and Development Changes: The setup demonstrated here allows for quick adjustments and iterations, essential for agile development practices.
- Simplified Model: While this example simplifies some aspects of a full-scale implementation, it provides a functional model to understand the integration of an API Gateway with an Identity Provider.
- Plugin Development: This environment is also conducive to developing and testing your own APISIX plugins without extensive setup.
Looking Ahead
While this guide covers the basics and simplifies some security aspects for clarity and ease of understanding, real-world applications may require addressing additional security considerations and more complex configurations.
In this tutorial, there are parts of the full setup needed that are omitted for the sake of simplicity and focus. For those interested in a deeper dive and more comprehensive examples, the full code for a fully functional setup is available on my public GitHub repository.
I hope this tutorial has been informative and helpful as you develop your skills in managing API gateways and implementing secure authentication mechanisms with Keycloak.