8 months with Texture (a.k.a. AsyncDisplayKit)

I have to admit that I love React & React Native. I began using React in 2014, and React Native in 2016. I loved RN not because of its cross-platform mechanics, but for its pragmatic approach when designing user interfaces and its ability to componentize a screen. A component can have its own state, and if the state is mutated the user interface depending on this exact state will re-render to reflect the new values.
It speeds up development and also makes the developer to avoid bugs with states not reflecting the values. The majority of my time is spent developing native apps, for which I had been trying to find an equivalent to React Native in terms of practices, to no avail. Until I stumbled upon AsyncDisplayKit (now named “Texture”).
I though I should share my experience so far.
Searching for a good UIKit replacement
What I was searching for was a framework / library that included the following:
- Deterministic behaviour when designing user interfaces. I was tired of UIKit warnings about conflicting constraints, especially when using xibs and storyboards.
- Easy to use, with understandable code required to create any UI.
- Able to resize complex components to fit their contents, especially when including images and attributed text. UIKit is notoriously difficult to master when resizing a complex UIView comprised of other UIViews in order to fit its entire content. Things get worse when rotating the device.
- It had to be able to be used with the plethora of custom controls and views already available via Cocoapods.
- It had to be FAST. Fast, Fast Fast. We are talking about native iOS, after all.
Facebook provides ComponentKit and Yoga for those purposes. However, I found ComponentKit’s syntax difficult to use, although ComponentKit is very fast, and is React inspired. YogaKit (the iOS API of Yoga) is still in beta at the time of this writing, but even if it wasn’t, I found its syntax to be a little bit verbose.
Stumbling upon Texture (formerly AsyncDisplayKit) was a breath of fresh air.
- It’s simple. Its documentation is just a few pages, and node placement happens according to 9 (at the time of this writing) layout systems from which probably 5 are most commonly used. Layout systems in Texture are predictable, fast, and simple to use.
- It’s Objective C and Swift compatible out of the box. No surprises there.
- It has a simple animation engine which will calculate transitions from one layout to another using a methodology like React Native’s allowing UI changes in the same view w/ just a few lines of code (usually just one). Covers half of the cases I need when moving views around.
- It’s stunningly compatible with UIKit, when using custom controls is required.
- It’s fast. Blazing fast. It makes calculations about rendering in a background thread, and uses the main thread just for displaying. It uses C++ for calculating object placement. In order to achieve the performance I did with Texture using plain UIKit, I would be required to write thousands of lines of code more than I did with Texture.
Standard Programming Practices
Texture is loosely based on the Flexbox layout methodology, following React’s and Angular’s lead regarding componentization of the UI.
Everything is a Node in Texture, which is a wrapper around standard UIViews. ASTableNode is a wrapper around UITableView, ASDisplayNode is a wrapper around UIView, ASImageNode is a wrapper around UIImageView. ASDisplayNode has properties which define stuff like how it behaves when resizing, and what is the default size. Convenience functions are also provided, like background colour, corner radius, etc. In case where you want to use other than the standard UIViews (like a view from an external framework, or a cocoa pod), you can easily initialise an ASDisplayNode and pass the content view while doing so, which will enable you to use it in any place where you would use any other ASDisplayNode.
Placement of nodes is determined by creating ASLayoutSpecs, which are placement instructors. ASStackLayoutSpec is the most common. It places the nodes inside it one after the other, either vertically or horizontally, and is being parametrised by the spacing between elements, the axis, etc. Each component inside may not be resized with the same priority with others. A flexGrow of 0.5 means that this component will grow less than the rest of the components in the stack (which will have 1.0) and will result in different size analogy between objects. A flex of 1.0 in all elements inside the stack means that all elements will try to have the same size. LayousSpecs can be placed into other LayoutSpecs.
Sample Use Case
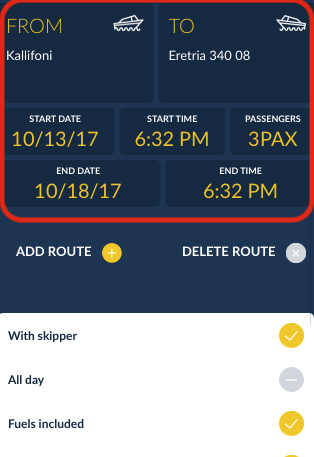
I was called to develop an application with a complicated business logic, regarding boat trips. The user would enter the start and end location, along with the start, end dates and the passengers for the trip.
So I designed the following screen, in which the red square is an ASDisplayNode (consisting of other nodes inside it)
The user would be able to enter multiple routes. So all I did was to create another node, at will, and call “refreshLayout()” on the parent node. Result:
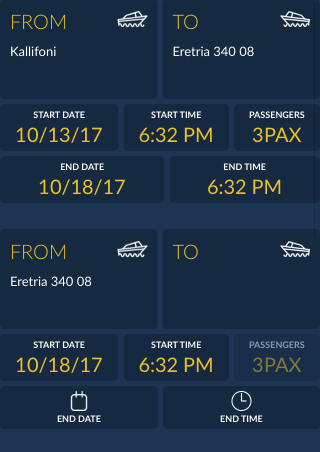
But wait, what about scrolling? What if the user adds many routes? Well those nodes do not know of any parent node. If you wrap them inside an ASScrollNode (2 lines of code), the content and frame will be automatically calculated. Yes. Really. No more auto layout issues.
The following is the code that lays out the outer content (sets up the scroll view, wraps the content view inside it)
self.outerScrollNode.layoutSpecBlock = {(_,_) -> ASLayoutSpec in
    return ASWrapperLayoutSpec.init(layoutElement: self.contentView)
}
self.node.layoutSpecBlock = {(_,_) -> ASLayoutSpec in
    return ASWrapperLayoutSpec.init(layoutElement: self.outerScrollNode)
}
And below is the entire layout code for the layout you are seeing in these screenshots:
override func layoutSpecThatFits(_ constrainedSize: ASSizeRange) -> ASLayoutSpec {
    let separator = ASDisplayNode()
    separator.style.flexGrow = 1.0
    separator.backgroundColor = UIColor.clear

    //add route and delete route buttons
    let addDeleteRouteButtonsStack = ASStackLayoutSpec.horizontal()
    addDeleteRouteButtonsStack.spacing = 10

    addDeleteRouteButtonsStack.justifyContent = .center
    addDeleteRouteButtonsStack.alignItems = .center

    addDeleteRouteButtonsStack.children = [
        ASCenterLayoutSpec(horizontalPosition: .center, verticalPosition: .center, sizingOption: .minimumWidth, child: addRouteControl),
        separator,
        ASCenterLayoutSpec(horizontalPosition: .center, verticalPosition: .center, sizingOption: .minimumWidth, child: deleteRouteControl)
    ]

    //manual vstack setup (children of arbitrary subclass)
    var vStackChildren = [ASLayoutElement]()
    self.requestRouteNodes.forEach { node in
                                    vStackChildren.append(node)
                                   }
    vStackChildren.append(ASInsetLayoutSpec.init(insets: .init(top: 10, left: 20, bottom: 20, right: 10), child: addDeleteRouteButtonsStack))

    vStackChildren.append(ASInsetLayoutSpec(insets : UIEdgeInsets(top: 0, left: 2, bottom: 0, right: 2), child: self.bottomContentNode))


    let verticalStack = ASStackLayoutSpec.vertical()
    verticalStack.spacing = 30
    verticalStack.children = vStackChildren

    return verticalStack
}
Yeah. The entire layout code. Each cell in layoutSpecThatFits() is a reusable component with its own lifecycle, able to calculate its own height, and take up the space it needs. And since each node is resized to use the space it needs, encapsulating all of these nodes into an outer one, will give the ASScrollNode all the information it needs to properly calculate scrolling, content offset and content size.
You may not even need a table view anymore (except if you have large lists with repeatable elements).
Because of this, creating large forms is also a breeze, since you don’t have to worry about reusable elements anymore.
Another example: A trip with one route, and another one multi-routes enabled (after the user has requested it). Note the squares. The two coloured squares indicate that this is the same exact node. But by encapsulating 2 nodes of the same kind into an outer one (with the white background), we give the impression that this is an entire node by itself.

And yes, I did this into a table node. With no changes into the cell class whatsoever. No layout problems. No different cells. I just threw two cell nodes into an outer one, to create a larger cell.
You can’t do that with UIKit that easily.
Is it time to abandon UIKit?
Certainly not.
Texture is a great and extremely fast layout engine, loosely modelled after Flexbox. Where Texture excels is reusable and refactorable user interfaces. But before you start replacing UIkit, let’s take a look at some caveats of Texture.
Texture is not as flexible as UIKit, especially in cases where the design instructs abandoning grid-layout. Therefore, parallax headers, UIKit’s physics engine, and animations that instruct abandoning the grid layout will not be possible with Texture. You may also have to abandon things like swipeable table cells or waste much time implementing something that Apple offers for free.
While using Texture you will also have to pay attention at the code, which tends to become much larger when compared with the code you write with UIKit (especially if you use storyboards). You should keep clear coding structure and discipline in order to avoid having code that you won’t be able to know how it works in the long term.
When working in a team, my impressions are mixed. I greatly appreciated Texture’s refactoring capabilities, cooperation with version control systems (have you tried merging changes from multiple people using storyboards?), and the ability to forget about resizing components inside scroll views is just insanely freeing. What I didn’t appreciate, however, was the hundreds of ASDisplayNode subclasses we were creating, which made navigation into the project difficult.
Regarding performance, I mentioned in this post that Texture is very fast in terms of performance. However, UIKit is also blazing fast. Where UIKit excels, is that it can feel fast even when doing the most complex animations and transformations, especially with iOS 10’s new animation engine. A good software engineer will always be able to squeeze a great amount of performance out of UIKit by eliminating useless AutoLayout calculations. With Texture, high performance can be achieved with less effort, but in terms of features, you may reach a peak that won’t let you go further. You may have a hard time implementing all those beautiful animations some apps have like bouncing elements, playful components that work with UIPanGestureRecognizer, and honestly, anything that doesn’t play well with strict layout guidelines.
In short, a team should choose Texture if:
- The project includes many reusable UI components and I need the flexibility of not caring whether I need a view inside a table view (UITableViewCell) or a view controller (normal UIView)
- The project will not use UIKitDynamics, or any other layout system whatsoever.
- They need or want to construct reusable forms, lists, views
- They don’t care about investing time into scaffolding the application before it reaches the time to implement features. Before you are able to create the basic components that your application will use, you will see that your productivity will be hindered. After this point, it will really pay off.
- Team members can wrap their heads around flex box, or React’s layout engine
- The team need extreme UI performance without having to invest much time to figure out Auto Layout’s intricacies.
Any team should avoid Texture if:
- They have a project requiring the use of UIKitDynamics, or should have the capability to use it in the future.
- Rapid prototyping should be done.
- The team prefers the use of Storyboards
- The team of developers are not disciplined in order to keep a consistent file / project / variable naming
- The team tried React’s layout system and hated it.
In short
8 Months into Texture (formerly known as AsyncDisplayKit) and counting, and I am loving it. I have barely scratched its surface in this post ( I suggest you visit Texture’s web page and see the rest of these features for yourself), and as I am becoming more skillful with this technology, the more I come to appreciate its potential.
However, although Pinterest uses it extensively, I think it will not be able to ever fully replace UIKit. But it is so powerful, that it’s worth giving it a shot and seeing if it suits your needs. I know that for more than two big projects, it has suited mine.
References / Links:
Re-architecting Pinterest’s iOS app
Introducing Texture, a new home for AsyncDisplayKit