React Native Navigation

I have been trying to find a good navigation library for a project I have undertaken, and I have been looking into numerous frameworks the last few days. Although I have been able to find some decent frameworks, I haven’t still found the best library for navigating i inside a React Native application.
So I decided to write my own.
Existing navigation solutions
Facebook themselves provide three React Native navigator components.
- Navigator is the default stable navigator component in React Native. Although stable, development on this component is stagnated, to give way for developing NavigationExperimental.
- NavigationIOS is an iOS – only navigator, providing a wrapper on top of a UINavigationController, allowing an iOS-like navigation.
- NavigationExperimental is the newest Navigation method from Facebook for React Native, allowing full control over navigation, with some pre-defined methodologies NavigationCardStack and some default interpolators for animating transitions between scenes. The API is not finalised yet, (hence the ‘Experimental’ in the name), but it is definitely the way forward.
There are a few 3rd party navigator components that I have examined throughout my research (and in other applications)
- React Native Router Flux. Probably the most feature-packed I have ever seen. Allows you to jump from one place to the other and pass arguments. Although my personal favourite, it uses a NavigationExperimental fork which is stuck in React Native’s version 0.26. Although Facebook has heavily already improved and altered NavigationExperimental with features like better threading and state management, the creator opted to stay with version 0.26, so that it won’t break between React Native updates, until NavigationExperimental is finalised.
- exNavigation. Not as famous like the other ones in terms of stars on GitHub, but definitely an approach that is more suited for those coming from native mobile development. Uses Redux for state management.
- react-native-navigation A wrapper on top of native components like UIViewController for iOS and Android, providing a navigation method which closely resembles the native approach.
It uses a more up to date NavigatorExperimental. EDIT: It’s not using NavigatorExperimental (see Philip Paetz’s comment on this)
A custom implementation
While experimenting with all these Navigators and methodologies I have some thoughts about what a Navigator component should have.
- I personally firmly believe that having a Navigator written in plain Javascript without the need for binding itself with native approaches like UIViewController on iOS. I have seen this approach on Modal in React Native (which uses a view controller when presenting a modal) and not only it doesn’t work very well (for some reason, the Inspector and Hot Reloading doesn’t properly work on Modals, although Facebook’s example works fine), but also forces the developer to know three technologies (Android, iOS, React) to properly understand what’s going on behind the scenes
- The navigator will be able to properly handle both Modals, and navigation inside those modals. Notice that when presenting a modal screen on iOS, you can present a UINavigationController, and continue pushing new screens inside this UINavigationController while keeping its state separate from the other app? I want this exact feature in my apps, it keeps it simple in my opinion (although if you intend to use Redux, things change – I am personally using MobX, that’s why this philosophy may not apply to you).
- It should be able to properly push, pop, replace (jump to another screen), and present a modal screen, with arguments.
Finding all these three features was not easy, especially when it comes with caveats, such as some bugs in 3rd party components (rnrf #1266, #1282) and some difficult to implement features like exnavigation #122 kept me thinking that I should get to know NavigationExperimental better before I use some 3rd party library.
Hence, this post! BTW, I will provide some code in this post, which will not by all means it’s going to be the best approach for solving the before-mentioned problems, however, an customized implementation of this is actually working very well for me.
Remember, NavigationExperimental is still not in its final stages, and best practices don’t yet exist (neither good documentation from Facebook).
The NavigationExperimental classes
The NavigationExperimental package comes with several classes, each one having its own uses.
NavigationCardStack is one of the most common navigation components. With this, you can stack scenes, meaning that you can go forward and backward when you push a scene, and then you pop it. When you use NavigationCardStack to display your scenes, they will be automatically encapsulated into NavigationCards, which are instances of a component designed to give the default styling of a scene which is embedded into a native-like stack, like a UINavigationController. It also provides default pan gestures, for vertical and horizontal transitions.
For animating the transitions, the NavigationCardStack uses the NavigationTransitioner class internally by default, which you can also use to customise the transition between your views.
The logic behind navigation
So I sat and began thinking how a native iOS application with navigation controllers, and modals with navigation controllers inside would look when translated with NavigationExperimental navigators
I decided to follow the iOS-like approach, which suited more to my style as an iOS developer. My application would start with Root navigator, with some pre-configured scenes.
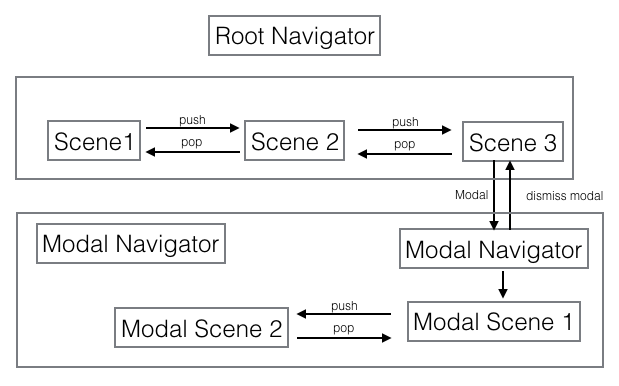 My navigator would first present Scene 1, and would be able to push Scenes 2 and 3, and when the time came to present a modal, I would present a new Navigator, with the same characteristics as the first one, but with different routes inside, the ones that would concern only the modal. That way, I expect my application to use multiple Navigators, each one representing a path, or a modal path.
Implementation
Since I intend to use multiple navigators, I will need to construct many of them, with the same characteristics, but different routes. This is why I opted to use the Higher Order Component pattern, which will be parametrised from a reducer function, returning routes according to keys passed as arguments.
If I were to instantiate my application root navigator and use it, I would do something like this:
When inside a scene, if you need to visit a modal and then navigate deeper inside the modal, you can do this:
The modal will be presented with a vertical transition, and will be able to have its own independent navigation. When inside a Modal Scene, no matter how deep in the embedded navigation stack you are in, you can always do this:
this.props.closeModal()
and close the entire modal scene along with its descendants.
Not only that, but pan gesture recognizers will work, too, although you may want to deactivate them if you present a ListView inside a modal scene using your custom navigator.
If you want to have a tab bar, you can have many instances of your custom navigator, one for each tab and then follow the same approach.
Further improvements
The code in this post is actually a very simplified version of what I am using for my application.
I have been forced to implement custom transitions using navigation interpolators, and render split-screen views, that changed my methodology a little, but the core idea is still there.
One thing I haven’t explained is how to render a navigation bar. I may do this in a later post, since I haven’t used Facebook’s NavigationHeader since my project forced my to heavily customize the navigation header to the point that it’s not a navigation header anymore 🙂
However, I strongly recommend you use it, because it first nicely since it implements the default transitions you see in the scenes, in the Navigation Header, too, without too much hassle.
Why such a hassle for just navigating?
I have heard many people complaining that navigation in a React Native application could be made simpler, if it followed Google’s and Apple’s approach to navigating inside an application.
That was my complaint, too, until I actually used React, and found that it is actually far better as a programming model for these tasks.
I could write an entire blog post explaining my thoughts, but it all comes down to this: NodeJS.
Yeah, I know, what actually runs React Native is JavascriptCore, but it’s actually NodeJS and you know it (most of its ecosystem, anyway). Thanks to this, we have tons of things developed to solve problems that iOS and Android have long been having, like reactive updates to the UI, state management and that god-damned class encapsulation (example for iOS developers: ever wondered why it is not possible to have the contents of a UITableViewCell placed outside of a UITableView, unless you do much work in advance?).
Examples of libraries and programming models that changed the way we think about state management and UI:
I’m sure there are ton more links that could fit here, but you get the idea.
Therefore, having a navigation system that throws these notions away just to feel more Apple and Google-like, would really seem like a missed opportunity.
I am a hardcore iOS developer, I love Objective C, and I adore Swift. However, I find Facebook’s engineering in React Native more realistic, solution-oriented, top-notch, and I am really glad that they didn’t just try to re-invent the wheel just for the sake of cross-platform development, they created something different in order to marry the best of the web programming paradigms into the native mobile ecosystem.
I am really impressed.
Conclusion
I have heavily customised the example I give here, and made it work with MobX, for reactively updating my components.
I am using this approach in a tabbed universal application, and each tab begins with its own navigator, and goes from there, creating additional navigators when modals are presented.
After this post, I really hope I have cleared some things up for NavigationExperimental.
If there is something you feel I haven’t examined as I should, or if you spot issues and mistakes in the post, please tell me so in the comments section below.